
In case you don't know, TrackIR is a hands-free infrared tracking device that replaces joystick Point-Of-View hats and keyboard view keys allowing you to move your view in the game simply by moving your head. It consists of a small camera that mounts on top of your computer monitor and detects three small reflectors either attached to a baseball cap or a clip version that fastens to the side of a headset.
This article will only cover the vector based TrackIR4 (or TrackIR3 with the vectoring add-on) version. Thus, subsequent use of the term "TrackIR" refers only to the vector device.
TrackIR is a "6DOF" device. That means it detects six axes of movement (referred to as "degrees of freedom"). The six degrees of freedom are:
To use TrackIR, a game must be designed to use it. Not all games do and not all support all axes of movement. For example, Microsoft Flight Simulator 2004 and X support all six degrees whereas LockOn Flaming Cliffs only supports three (Yaw, Pitch, Z).
Refer to the manual for details. The important issues are to mount the camera so that it is at the same level as the vector clip (baseball hat clip) or the Track Clip Pro (clip that mounts to your headset). Also, be sure the camera is lined up horizontally with your reflectors as well.
First, make sure you have the latest TrackIR driver from NaturalPoint.
Spend a little time reading through the manual. You can easily read through it in a half hour or so and it is definitely worth the time.
The best way to run the TrackIR software is to configure it to:
When you first bring up the program, click the Options button and set things up this way:

Next, bring up the Tracking Window:
![]()
This is a vital part of the setup. Your Tracking Window should look very similar to the one in this picture. The important elements are:
![]()
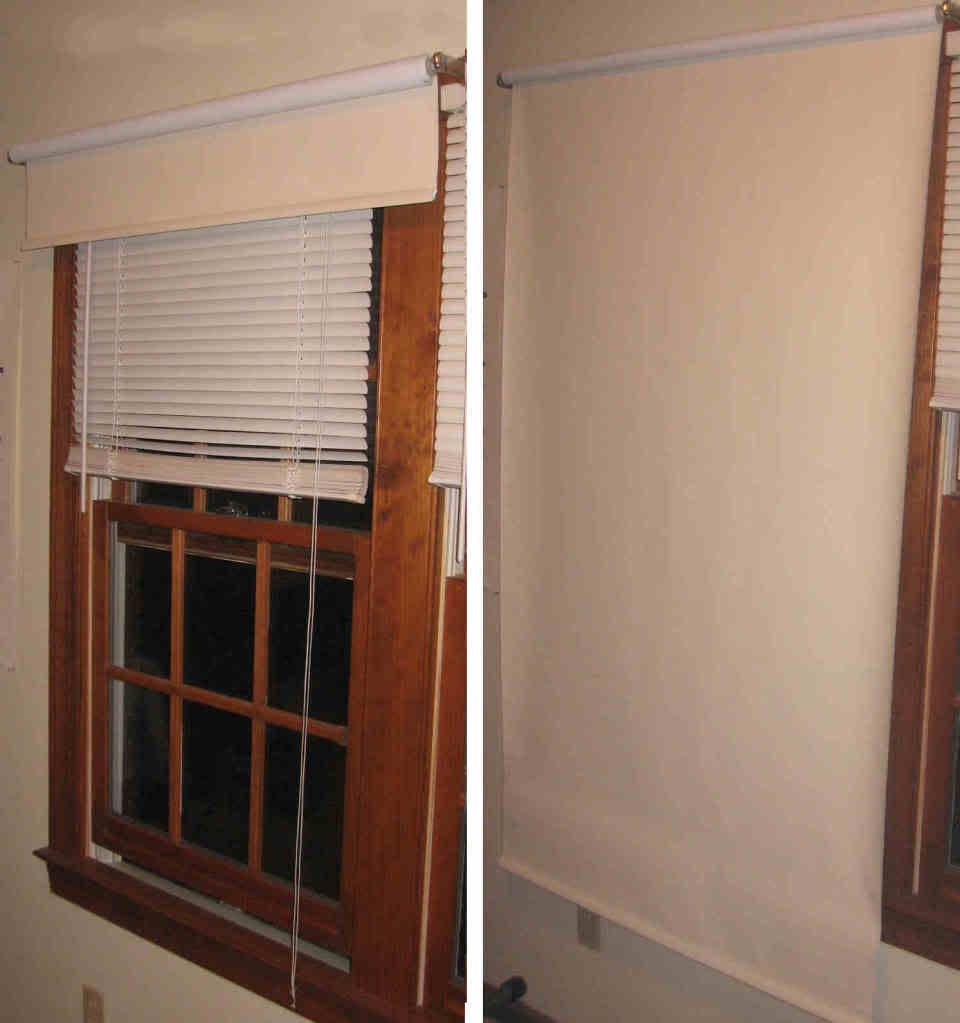
To solve the above problem (it was an actual problem in my environment), I bought a maximum-block window shade at my local home center for $20. Since it was only the window on the left that was causing the problem, I only needed to put one shade up. Now, I can use TrackIR in the brightest of days and not have to darken the entire room.
Next, adjust the settings on the Tracking Window. Click the Settings button and set things up this way:
![]()
Now the fun begins.
Setting
up a good profile is a slow, tedious process. I spent a couple of
months getting mine just the way I wanted it. If you would like to try
my profile (also referred to as the famous "Dentin's Patch"), you can grab it here. I originally got it from Mace, one of the Aces High (WW2 combat game) trainers and further modified it to my own taste.
A profile is an axes configuration to be used for a particular game or class of games. There are four canned profiles available with the software and you can try them out and if you are satisfied with them, your work is done. Chances are, eventually, you will want to tweak the settings a bit so you will want to learn to build your own profiles. The four supplied profiles are:
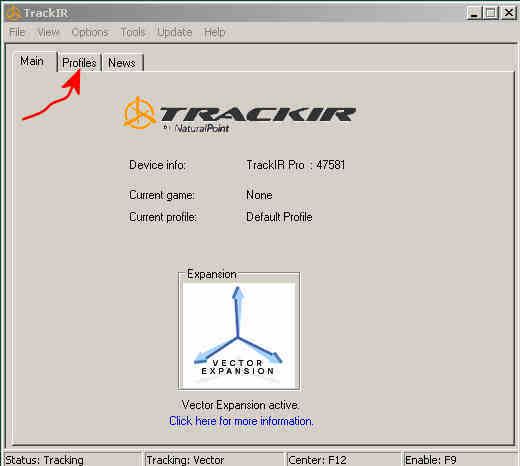
To access the profile management area of the program, click the Profiles tab from the main window:
There are two ways to build a new profile. The first way is to click the New button from the Profiles window:
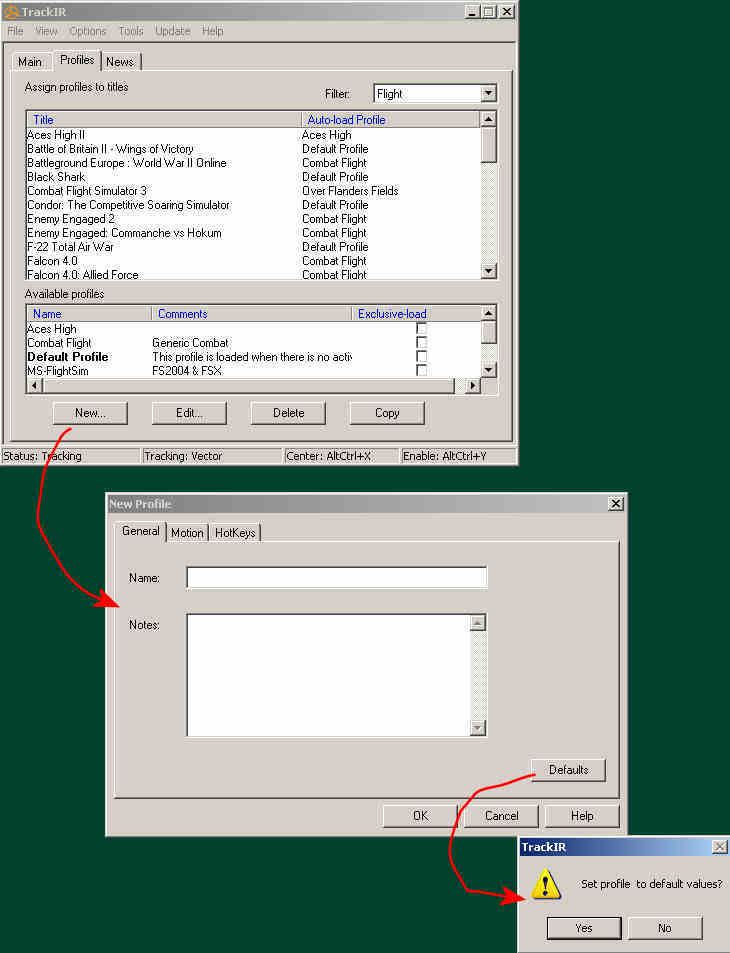
To give yourself a good starting point, you should click the Defaults button and that will set the new profile up just like the Default Profile.
The second way to build a new profile is to highlight a profile that is similar to the one you want to build and click the Copy button. This will make a copy of the profile and you can begin modifying it. You will then use the Edit button to begin modifying your new profile.
After clicking New or Edit, you will get a window with three tabs:
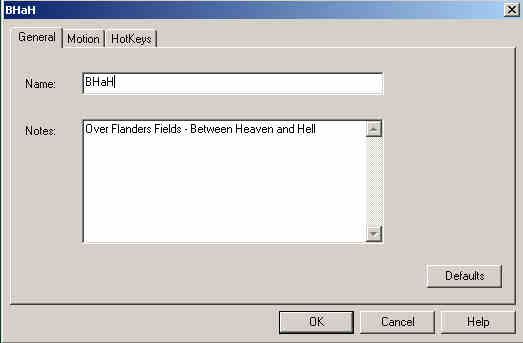
In the General tab you will name (or rename) your profile and be able to give it a description:
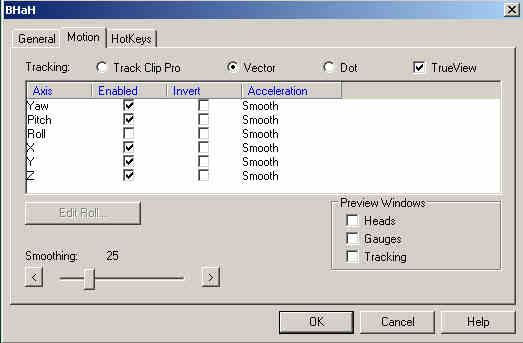
The Motion tab allows you to:
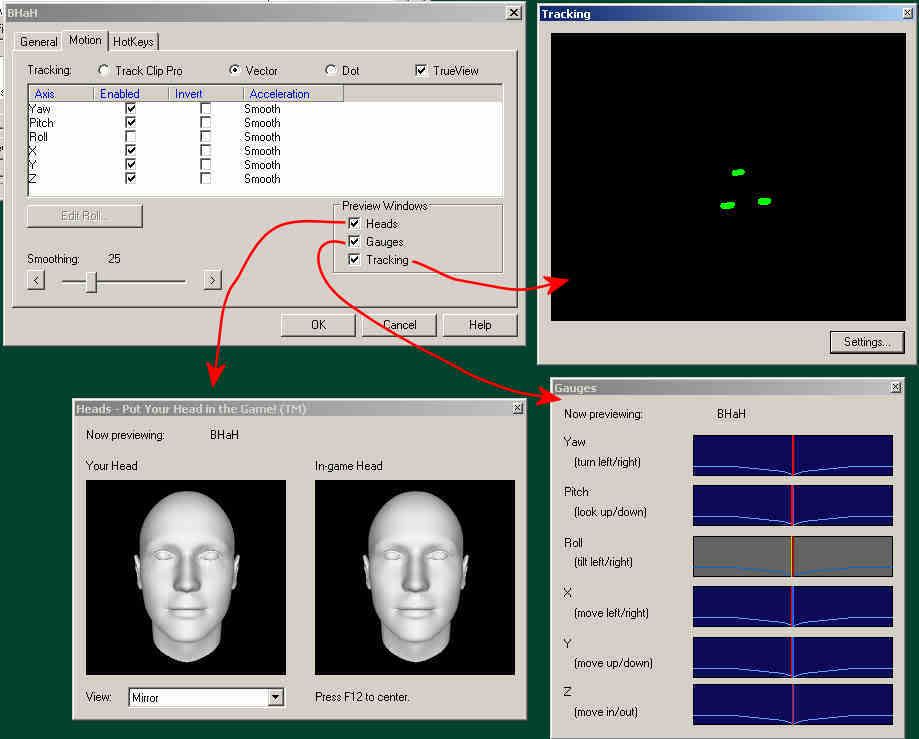
Here are the Heads, Gauges, and Tracking windows you'll see when you select them from the Preview Windows:
The HotKeys tab allows you to modify the keys you use to control your TrackIR device while playing the game. There are three hotkeys used with TrackIR:
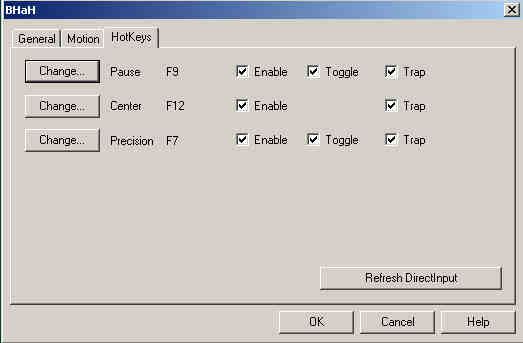
Use the Change button to change the hotkey from the default. I recommend you choose some key sequence that is not used by any of the games you play. I found that
ALT + CTRL + X, Y, Z
are good choices for me.
The Enable checkbox enables that particular hotkey. You can use this feature to disable an unwanted control.
If you uncheck Toggle, the hotkey will remain in effect as long as you hold the key sequence down. If checked, pressing the sequence once will turn the function on and you'll have to press the sequence again to turn it back off. On is probably what you want in most cases. You might want to experiment with un-toggling Precision and use it in conjunction with your firing button.
Trap prevents the hotkey from interfering with conflicting keys in other programs. I always leave this checked but I also try to use key sequences that are not used by any other program as that is just flirting with danger.
Now we are ready to edit the behavior of the (up to) six degrees of freedom of TrackIR for the game(s) your profile is to control. To do that, you will click the Edit axis button which will bring up the Curve Editor. You will want the Heads and Gauges preview windows open before you bring up the Curve Editor as you will want immediate feedback as you make changes to the axes.
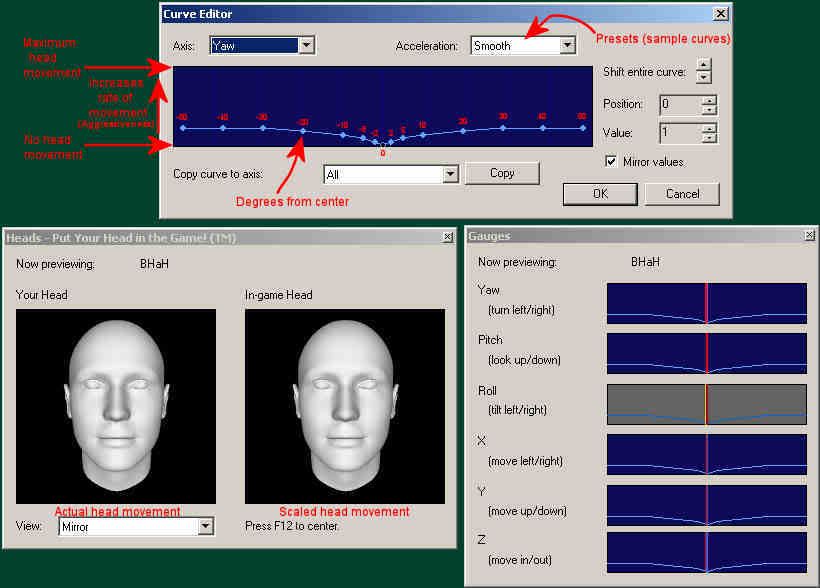
In the Axis: pull-down, you will select the particular axis you want to edit. We are editing the Yaw axis in the picture above.
The Acceleration: pull-down allows you to select one of five preset (sample) curves you can choose from. They are: Linear, Smooth, Aggressive, DeadZone, and Progressive. You can select one of them and use it as is or edit it. If you make any adjustments to the curve, the Acceleration: pull-down will change to Custom.
The curve that appears in the blue window is a graph of how that axis of movement will behave as you move your head along that axis. The horizontal axis of the graph is the number of degrees from center (0 degrees). There are fifteen points along this axis where you can make adjustments:
-50, -40, -30, -20, -10, -5, -2, 0, 2, 5, 10, 20, 30, 40, 50
degrees of movement of your head from the center of your computer monitor. This means that TrackIR allows fifty degrees of actual head movement to one side of the axis and fifty degrees to the other side for a total of one hundred degrees and fifteen points along that axis where you can scale head movement for in-game.
The vertical axis of the graph represents the responsiveness (sensitivity or aggressiveness) of the movement. If you move one of the fifteen points in the upward direction, the movement of your head will be more aggressive (sensitive) at that angle off center. You can move one of these points simply by grabbing it with your mouse and sliding it up or down. If you pull the point all the way down to the bottom of the graph there will be no movement of your head at all at that point. If you move the point all the way up in the graph then you will get maximum movement at that point. You can move the entire curve as a unit up or down by clicking the up/down arrows of the Shift entire curve: which will make the axis more or less aggressive overall. This is a very handy feature as you will want to experiment with adjusting the aggressiveness of your axes. I have found it much better to make my curves as aggressive as possible.
As you edit the curve, you will see the immediate result of the change in the Heads and Gauges windows. In the Heads window, the Your Head window shows the actual movement of your head while the In-game Head shows the scaled (result of the axis curve edit) movement of how your head will look inside the game. The Gauges window shows another way of viewing the movement. Between these two windows, you will get a good idea of how your head is going to move in the game.
For combat games, I recommend making your axis curves as aggressive as you can stand. It may take some getting used to but try to keep the movement fast. You might want to bump up Smoothing a little as you increase the aggressiveness of the curves.
Here are the curves for the five preset curves built into the Curve Editor:

The following are the five axes curves (I don't use the Roll axis) that I use for the combat games I play. Notice that I have them set pretty aggressively. It takes a little getting used to but I can whip my head around great which is very important while in the midst of a dogfight.

Profiles are stored in files. For example, the Combat Profile is stored in:
C:\Program Files\NaturalPoint\TrackIR4\Profiles\combat_Flight.xml
You cannot edit this file directly (using Notepad etc.) but you can view the file using a web browser. Right click on the file and select Open With and then select Internet Explorer. You will see the xml code of the profile. You can copy this file around, share it with your friends, etc.
Here is the BHaH profile I use for Over Flanders Fields:

TrackIR, IMHO, is the second most important device next to a good joystick that you can own when playing flight sims. Spending the time to get this device working properly is an investment which pays huge benefits. I hope this article will allow you to get the best use out of your TrackIR device.