AlacrityPC allows the user the ability to automatically shutdown services and programs in order to provide as much resources as possible to running today’s most demanding applications. It also provides the ability to launch selected programs before the application begins running. In addition, it can automatically restart those programs and services previously shutdown thus bringing the computer back to its original state. AlacrityPC provides options like Defragment Memory and Force Idle Tasks to Execute to enhance performance. There are other similar programs around, such as EndItAll, but none I have found have the features and capability this program has. It's a bit more complicated to get configured properly which is why I've written this configuration guide.
The program was written by Ken Salter who hosts a help forum to support AlacrityPC. I advise you go there and establish an account so you can seek and give help with this program. Ken develops and supports AlacrityPC strictly as a labor of love. He asks no money for it but please, if you, like me, think this is a great program, I truly hope you will click the Donate button and help him a little financially.
AlacrityPC is the sequel to FSAutoStart which was originally designed to start Microsoft Flight Simulator. Thus the name. AlacrityPC has been improved considerably with nicer interfaces, better information on services and programs, and better performance. Just like it's predecessor, AlacrityPC is perfectly adequate for starting any game or application of any sort that demands as few processes be running on your computer as possible. One of the hassles with trying to do something like this without this tool is you need to reboot when you're done because you want to get those processes you stopped running again. AlacrityPC takes care of that for you as it "remembers" what it stopped and starts them back up again for you. Another great feature of AlacrityPC is it can start other utilities before it launches your game. One such utility that I wrote runs a little program that ups the process priority of TrackIR so that it runs smoother. (Look here if you're interested in reading more about that program.) In the tutorial that follows, I'll show you how to include that program as well as other cool tricks in the setup of AlacrityPC.
Before you get into the meat of AlacrityPC, you should spend some time cleaning up the programs and processes on your computer. The more thorough a job you do here makes setting up AlacrityPC much easier.
There are three categories of cleanup you should perform before you turn your eyes toward AlacrityPC:
I Removing obsolete and unnecessary programs from your computer.
II Stopping unnecessary programs from starting up at bootup time.
III Cleaning up system services (processes that start with the operating system) put there either by the OS or other programs you have installed.
We will work through these three categories in turn before beginning the AlacrityPC tutorial.
You will be surprised to discover just how many programs are on your system. Many of them you probably don't even recognize or knew where there. In many cases, new versions of programs get installed and the old ones are still laying around wasting disk space or worse, running services that never get used. Cleaning up here is a vital part of making your computer run faster and smoother.
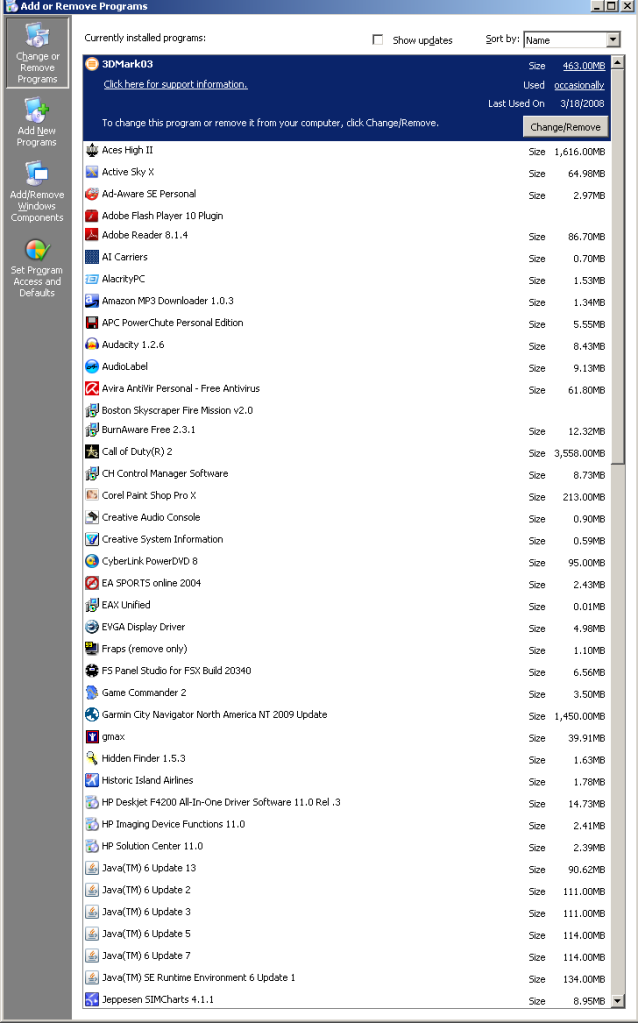
To remove unnecessary programs, we will use Microsoft's Add/Remove Programs. In Windows XP, you call this program up by clicking:
Start-> Control Panel -> Add or Remove Programs
Warning!
Before you delete anything, you should make screenshots of the Add/Remove Programs window and print them out or save them on your system somewhere. The easiest way to do this is to open the window as much as your screen will allow and do a "print screen" by pressing the Print Screen key. Bring up a graphics design program (e.g. Microsoft Paint) and paste the screen (CTRL-v) into the graphics program. You can crop the pasted window down to the size of the program window then save the file on your computer and/or print it. Then, scroll the Add/Remove Programs windows down and repeat the process until you've saved every program listed in that window.
Trust me, you want to do this! You'll be sorry if you don't! You should be careful to do this for every place in this guide where you are about to remove a file/program/service from your system. You must resist the temptation to "clean-house." Take baby-steps here. Make sure you understand exactly what you're getting ready to delete before you do it. Use Google to help you understand what something is if you are in doubt.
To remove a program, simply click the Change/Remove button to the right of the program you wish to delete and follow the prompts. In some cases, you will be prompted to reboot the computer. You should probably reboot anyway after you are done removing all the programs you no longer want.
Again, you will be shocked to discover how many programs automatically startup when your computer boots. Hopefully you've trimmed that back a little by doing a good job of removing unnecessary programs. Still, there are certainly going to be plenty of cleanup you can do here. The program that does that is msconfig. You bring this program up by clicking:
Start->Run...
When the Run window pops up, type in msconfig in the Open: box. msconfig should start:
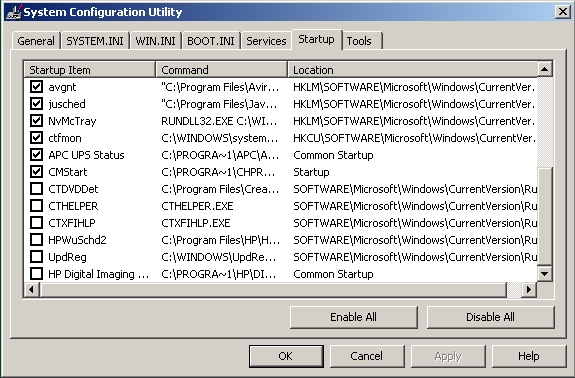
Click on the Startup tab and you'll see all the programs that start up at boot time. Unchecking them will stop them from starting. What's nice is when you uncheck a program, it will not disappear from the display so if you discover later than you shouldn't have stopped a program, you can easily check the box again and get it back to it's original state. Trace the command back to it's source to determine what the program is and use Google to help you when in doubt. Again, don't "burn the house down here!" Work slowly through the list and reboot the computer often after you deselect programs to make sure you're not doing harm to your system.
Microsoft operating systems always start a bunch of processes (services) you don't want. To make cleaning up these services much easier, Black Viper has a web site dedicated to trimming down your OS. This is a fantastic site and deserves the time you invest in reading through it and following his advice. If you choose to skip this step, you will probably be back because when you get into the service configuration part of AlacrityPC, you will be faced with all these services, what they do, and which ones you can stop. You might as well deal with that here. Your system as a whole will be better off. If you choose the "SAFE" settings that Black Viper recommends you will be fine and you'll be amazed at how many useless services will go away. Once at his site, find your system in the left column and use the "SAFE" column of the table to decide which services can be turned off.
Like earlier, before you start changing service settings, you should print out your current services (Services.msc: Action-->Export List, choose "Comma delimited" .csv file if you have MS Excel) so you have a recorded list of what your system looked like before you started cleaning up.
When you're ready to configure your services, click:
Start-->Run-->services.msc
You should see a screen similar to this:
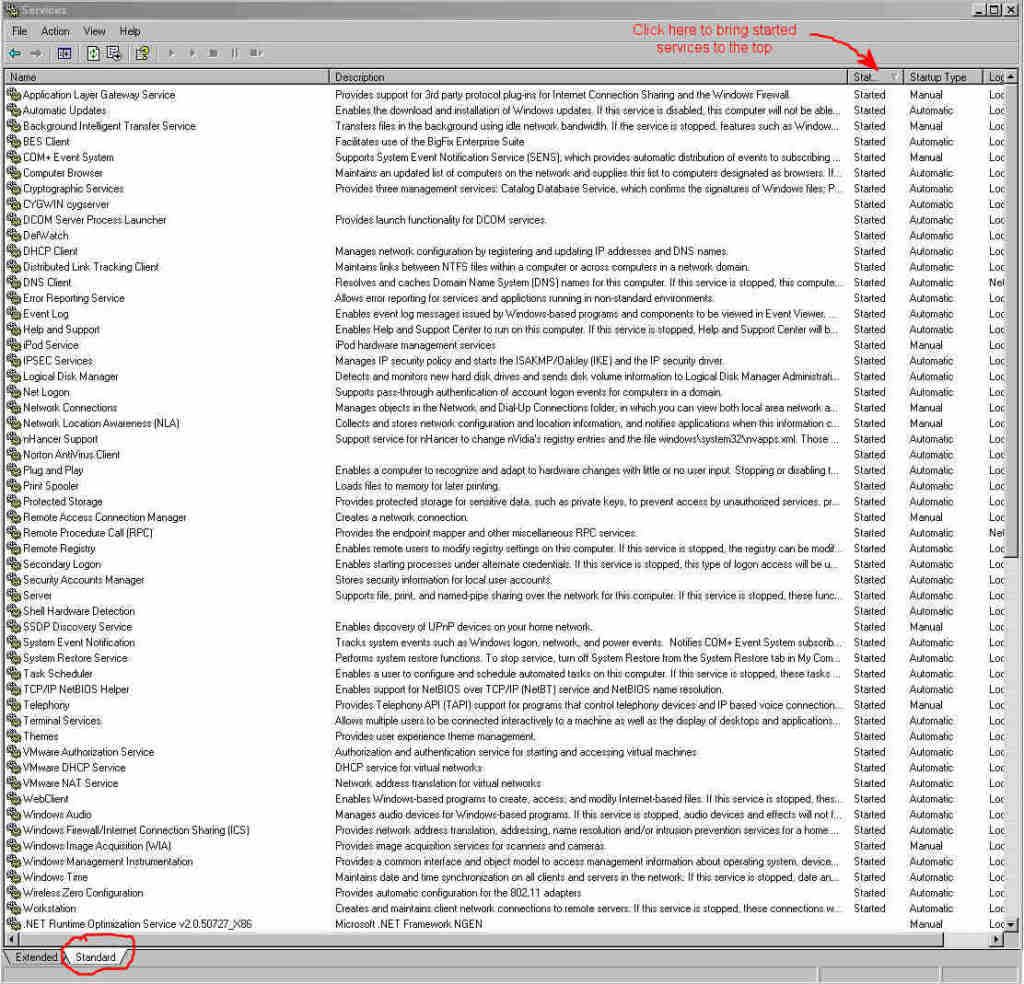
To make things a little easier, click the column head Status twice which will sort the services so as to bring all the ones that are currently running to the top of the list. Also, click the Standard tab at the bottom to make the overall window a little smaller. In this list will be the standard Microsoft services that come with your OS (which BV describes and gives advice on) together with services of programs that you have installed on your computer since the OS was installed. Because not all the services are OS installed ones, you may not know if you can/should stop them or not. I will assume that if you installed these programs on your computer then you really want their associated services to be there. You might want to bring up Add/Remove Programs and actually un-install any programs that should not be on your machine. If you find services that you have no idea what they are and why they're there (and you will), right click the service name, bring up the Properties tab and copy the process name (e.g. srvany.exe) from the Path to executable: field. Then paste that process name in Google and you should find several sites that talk about what that process does. You should then have enough information to make a wise decision about whether you can disable the service or not. It's a tedious process but well worth the investment.
Finally we get to the actual installation and use of AlacrityPC.
This tutorial should work for any game as AlacrityPC is very flexible and configurable. The configuration process consists of the following tasks:
To download AlacrityPC, go to the AlacrityPC Support Site and save the program somewhere on your filesystem. After installation is complete, you should have an icon on your desktop like this:
Click the AlacrityPC icon on your desktop and you should see a screen similar to the following:

Click the Next button and you'll get the initial screen:
Before you go further, take a minute to set up the couple of program options that will serve you well in your use of AlacrityPC:
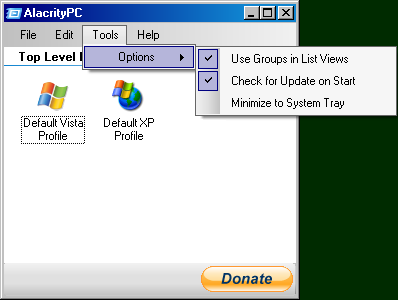
Check the Use Groups in List Views and Check for Update on Start. The first option will make viewing your services and programs easier to organize and the second option will assure that you are always using the most recent copy of AlacrityPC. Though it will get annoying to have the check for a new version every time you bring up the program, you will find that after a few days of getting your profiles set up, you will actually run this program directly like this very infrequently. Having it check for updates will not seem quite so annoying during this infrequent use. I can't imagine why you would ever want AlacrityPC to start up in the System Tray. I always leave that option unchecked.
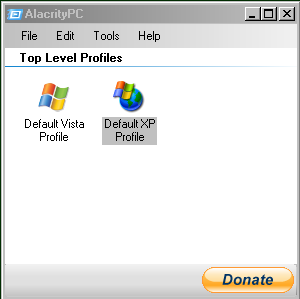
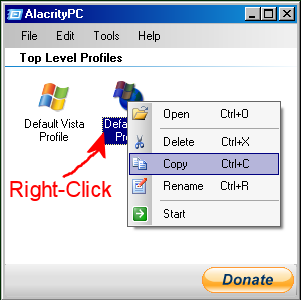
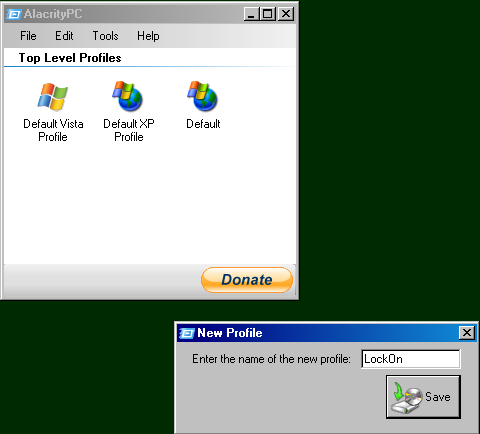
In the initial screen you see two default profiles. A profile is a particular configuration; that is a set of programs/services/options that get altered in preparation for starting a game or set of games. To help you get started, AlacrityPC provides two profiles you can use as a platform from which to start from. Depending on your system (Vista or XP), you should make a copy of that profile so that at no point will you be making any changes to either of these two default profiles in the event you want to get back to the "beginning" of the setup process.
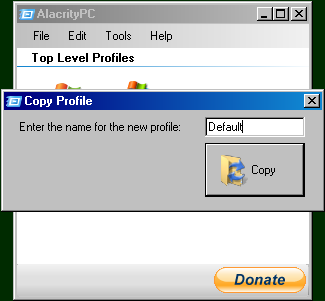
To make a copy of Default XP Profile (for example), right-click the icon and give the "copy" a unique name. I just use the name Default as I am the only person using my computer and that name is simple and obvious in function.
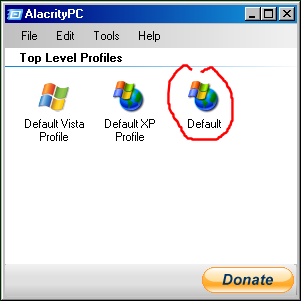
Now that you have your own Default profile, the two originals will be preserved and you'll also have a customized profile you can use to build all the profiles you set up for individual games. More on that later.
Most of your effort will be spent getting your Default profile configured. The good news is you will only have to do this work once and adding new games to the configuration will be much easier as game profiles are designed to "inherit" from this Default profile.
To begin editing the Default profile, click the Default icon:

...which will bring up the Default Profile configuration window:
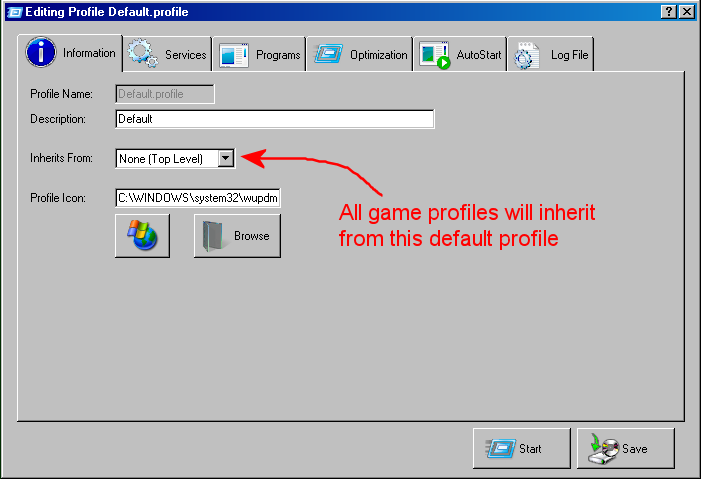
Notice the Inherits From: pull-down defaults to None (Top Level) which is exactly what you want for the Default profile. All your games will "inherit" from this profile.
The only field you will want to change in the Information tab is the Description:. Here, since this is your default profile, simply enter "Default."
Next, set up the Optimization tab.
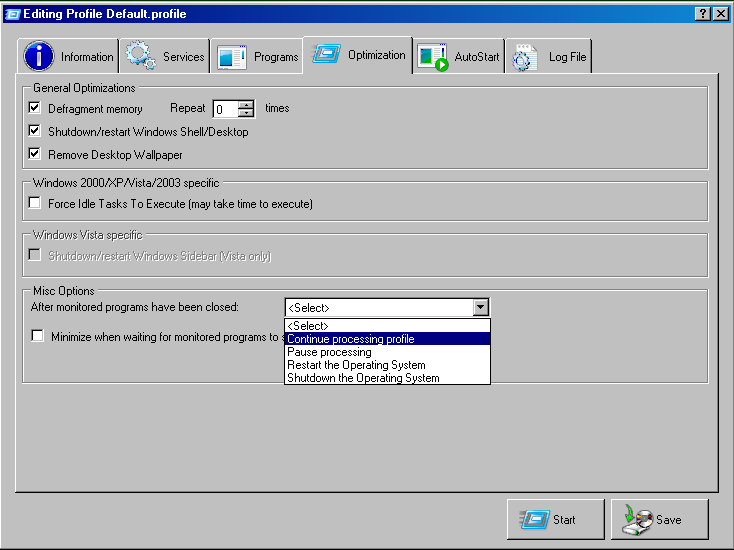
The most important part of the Optimization tab is to set the After monitored programs have been closed: pull-down in the Misc Options section to the value of Continue processing profile. You will not be able to save your profile until you set this field! That's why you want to do this early in the Default profile setup. The Continue processing profile option will case AlacrityPC to progress normally through all your profiles, starting up any programs you specify, stopping services and programs, firing up your game (referred to as a "monitored program") and finally restarting the services and programs it stopped. Using any other of these four options will prevent AlacrityPC from progressing through that entire process. You would only ever use the other options in a debugging situation.
For normal operation, you will always use Continue processing profile.
It is recommended that you check all three boxes in the General Optimizations section. The only one you may want to uncheck is Defragment Memory as that one will slow down profile startup quite a bit and if you have a lot of physical memory in your computer, it may not give you much benefit. You can experiment and see what you want to do here.
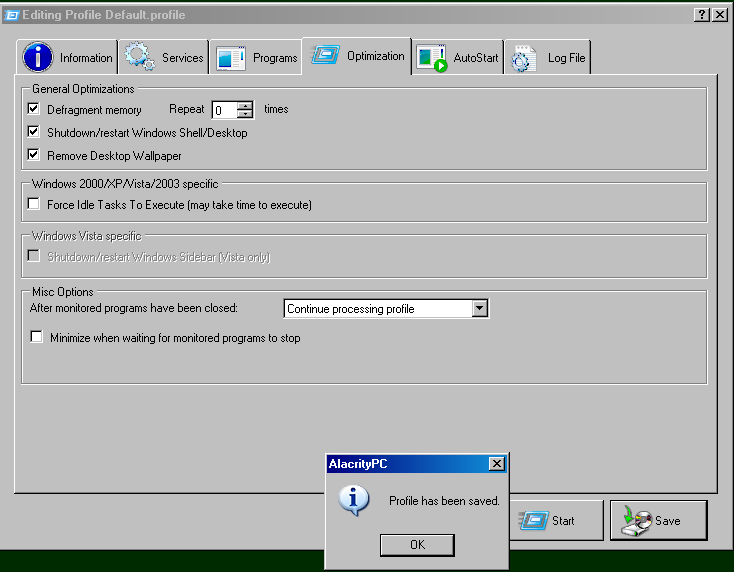
Now is an excellent time to save your profile. Click the Save button.
The configuring of services and programs is the heart of AlacrityPC. Here is where you decide which services you want to suspend. If you worked through Black Viper's site carefully, this task will be pretty easy as you will already understand what all those services you have running are doing.
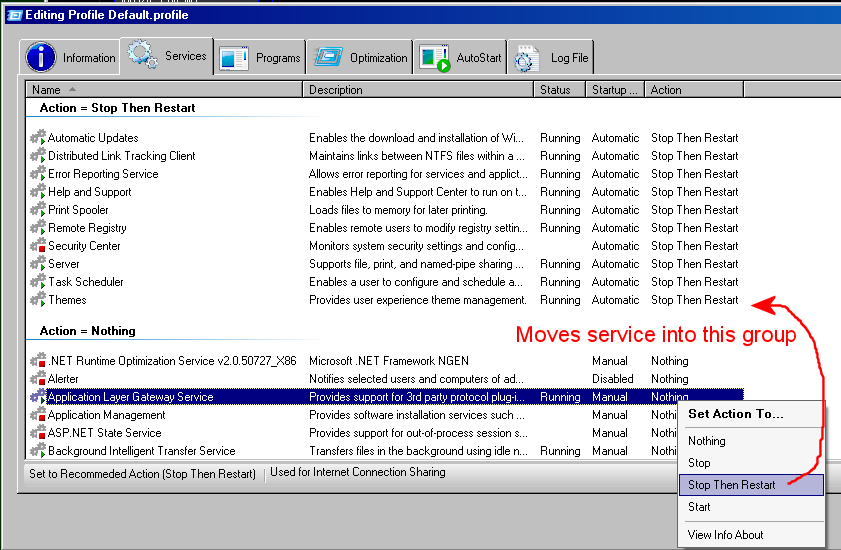
Click the Services tab to bring up the service configuration. Due to the Use Groups in List Views program option you selected when you first set up the Default profile, you will see the services organized according to the Action they are set to perform when the "monitored program" (your game) starts. Those four actions are:
There is a fifth option, View Info About, in the Action pull-down which is not an "action" per se but serves a very useful function. This option will bring up your web browser and point you to that service in the Black Viper site so that you can easily determine what that service is. Pretty cool!
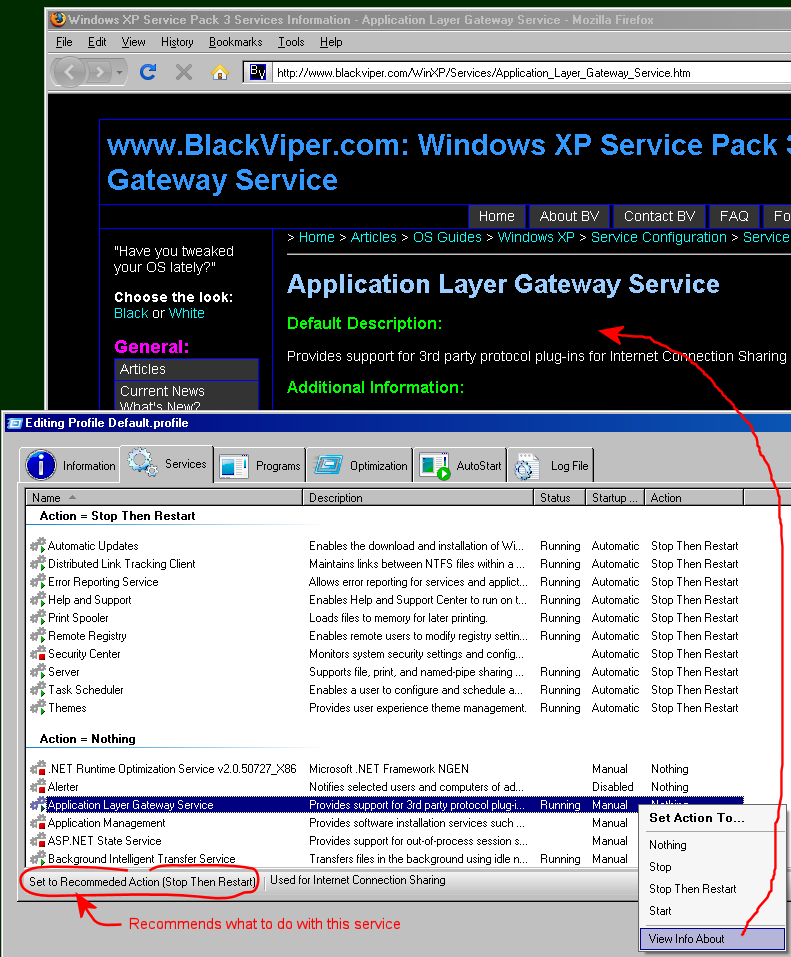
One of the most useful bits of information is the Set to Recommended Action hint at the bottom of the window when you select a service. This gives you the recommended action you should take on that service. One approach to setting up these services would be to simply go down the list and set everything according to what's recommended. You probably should research things a little better than that but the recommendations certainly make things much easier.
When you change the Action on a service to Stop Then Restart, that service will get moved up into the Stop Then Restart group. The same is true for all the other actions. This makes viewing the services and their actions much easier.
After working through all the services in the list, be sure to Save before closing the window. When you start the game, you may find that some services will not stop or are not found. You may even find your computer reboots or hangs (if you've stopped processes you shouldn't have). No big deal, just change the action back to No Action for that service and try again. You will just have to "trial-and-error" your way through.The recommendations are very good though and if you follow them closely, the only real problems will be services that are "post-OS."
Using the same method you did with services, you will work through programs that are running. These are typically programs that are running in your System Tray. Things like printer utilities, volume controls, etc, can safely be suspended as you likely don't want to print etc. while playing the game. Again, it's a "trial-and-error" process and you'll likely need to make a number of passes through this before you are satisfied.
For Windows XP running SP 3, if you get down below 30 processes, you're doing pretty good. I think I'm running with 32 processes right now and I'm sure I could get down below that if I worked at it a little more but that's not bad. How far you want to go with this is a judgment call. The weaker your computer is will determine how important trimming the processes down will be.
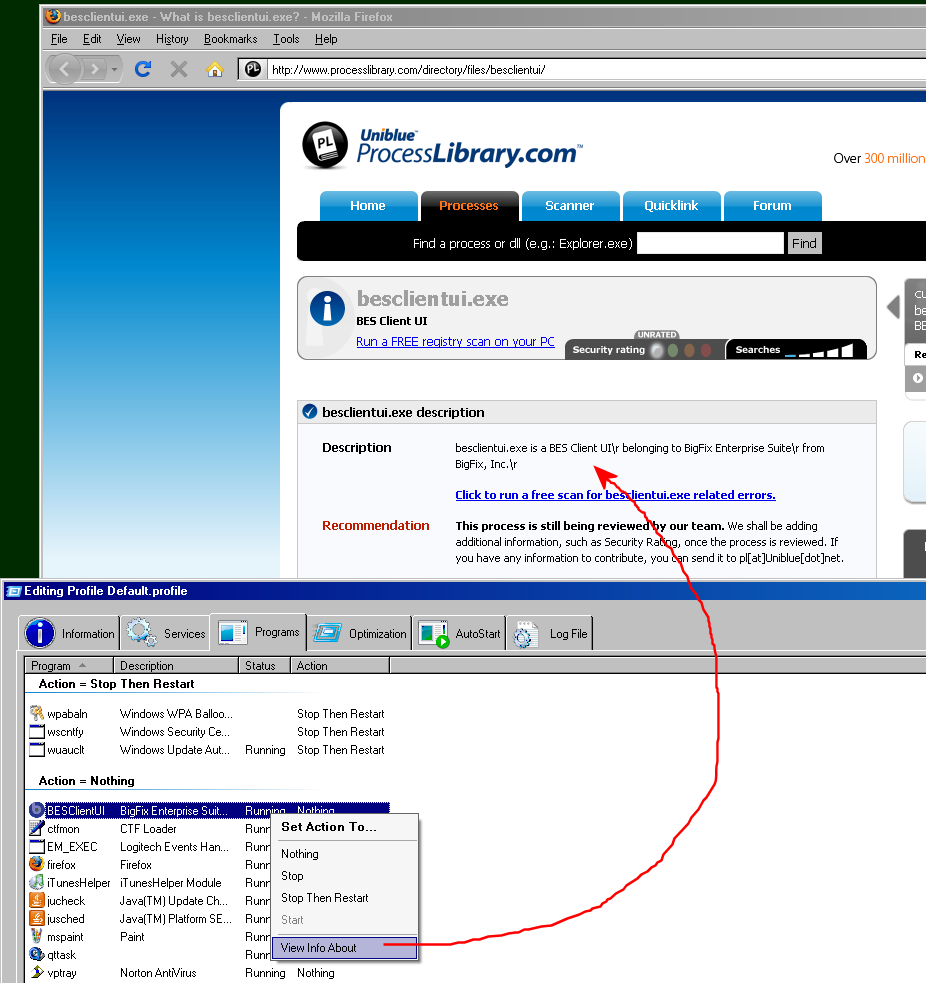
To configure programs, click the Programs tab. The structure of this tab is very similar to Services. The View Info About option will bring up a web site that tries to explain what the program is and any information that is known about it.
You may choose the Auto Shutdown/Restart All Non-Essential Programs option but I believe it's better to go though these programs one at a time so that you know exactly what is going to be suspended. You may even discover a program that has no business running at all!
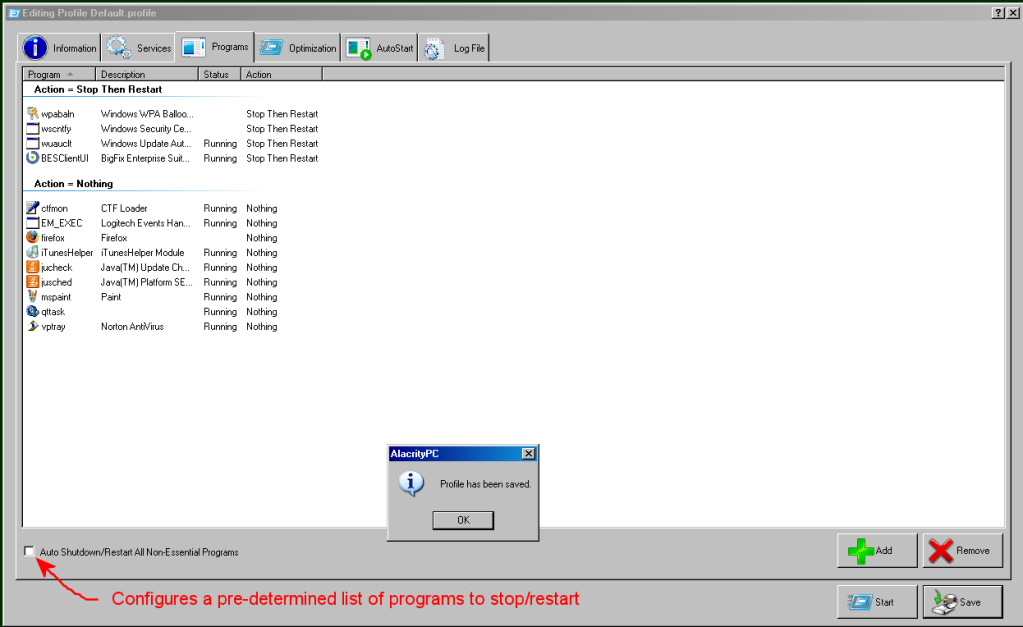
As always, be sure to Save after you've configured your programs.
The AutoStart tab is where you configure AlacrityPC to start the "monitored program" (your game) and any other programs you want to start at the same time your game starts. However, since we are setting up the Default profile here (that all your game profiles will inherit from), you do not want any programs in this window at all unless you have programs that you want to start will all your games. It is your choice whether you place those programs here or in the game profile.
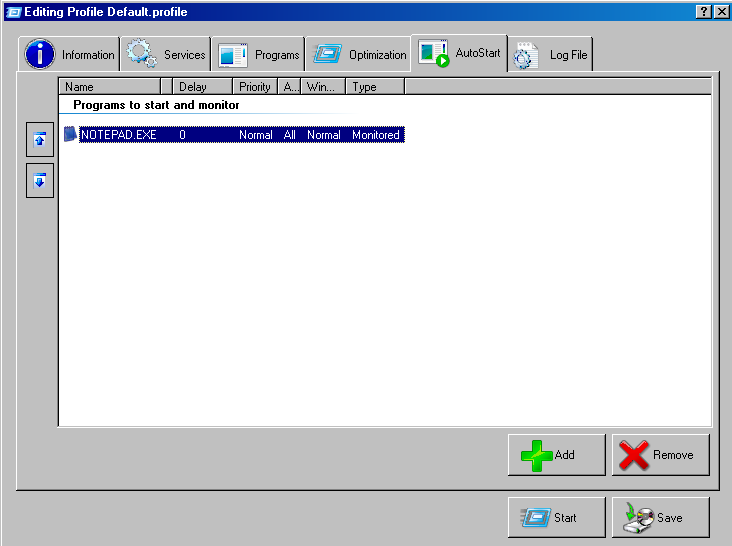
When you click the AutoStart tab, you will find the NOTEPAD.EXE program in the window by default. This is just an example showing you how a "monitored" program will look and you should delete this program. Press the Remove button to delete the program. Your Programs window should now be blank.
Your Default profile is now completely configured. Be sure to Save before exiting. Next, you'll set up profiles for the games you want AlacrityPC to manage.
In this part of the tutorial, you will build a profile for each of the games you want to control with AlacrityPC. Creating a game profile is very easy as it inherits most of it's tasks from the default profile. The main purpose of the game profile is to tell AlacrityPC which program to monitor (i.e., game to run). Once you create one game profile, adding more is even easier as all you would need to do is copy the working game profile and edit the game it monitors.
Since the Default profile is doing most of the work of cleaning up services and programs, the "game profiles" primarily do the work of launching your game and any other program you want to start with it. You will use the AutoStart tab to set these programs up.
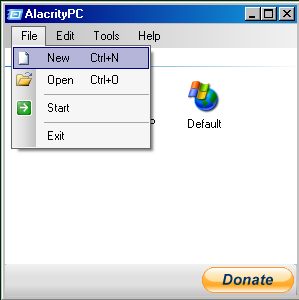
Just like you did when you built your Default profile, click the New option from the File pull-down:
Give your profile a name (in this example I'm setting up a game profile for LockOn Flaming Cliffs).
After saving your new profile, the profile configuration utility will appear and place you in the Information tab.
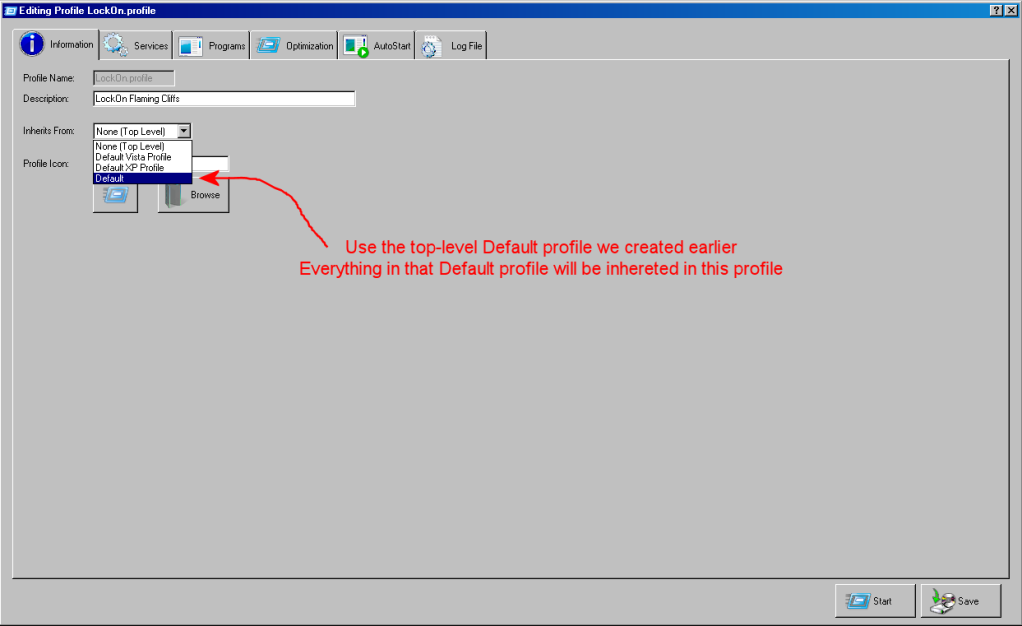
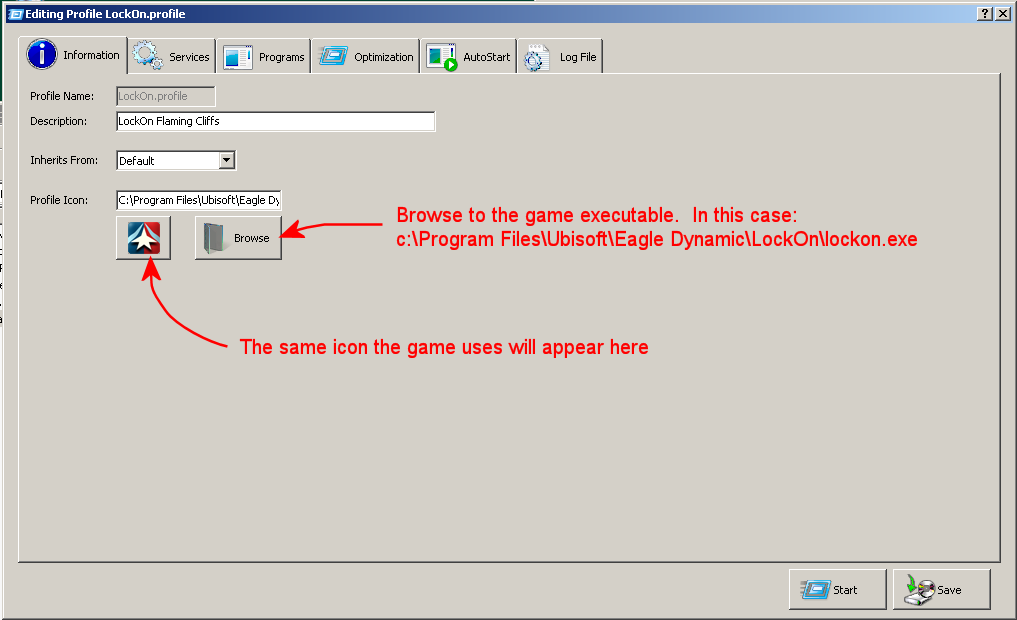
Enter a description of the profile in the Description: field and be sure to choose the Default profile (we worked so hard building earlier) that this profile will inherit from.
The final task on the Information tab is to set the profile icon to match the icon your game uses. To do this, click the Browse button and navigate to the game executable and select it. The game profile icon will then appear in the window:
The only thing your game profile needs set on the Optimization tab is:
Set the After monitored programs have been closed: pull-down in the Misc Options section to the value of Continue processing profile.
As with the default profile, you will not be able to save your profile until you set this field!
Be sure to save your game profile at this point before continuing.
The Services and Programs Tabs
Unless you want to override something you set up in the Defaults profile, there is nothing to do in these tabs. However, any services or programs that you need specifically to the game you are launching can be configured here.
The AutoStart tab is where you configure AlacrityPC to start not only the "monitored program" (your game) but any other programs you want to start at the same time your game starts.
Let's add your game first.
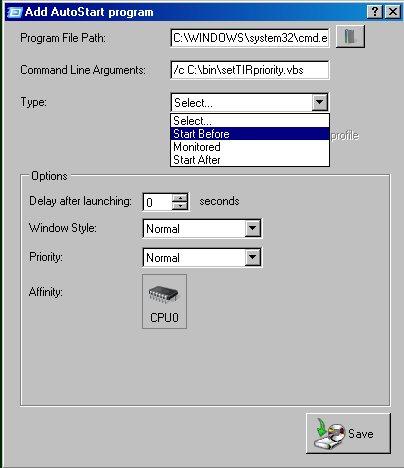
From the AutoStart tab, click the Add button(big green "+" in the lower right corner of the window). You'll see a screen like this:
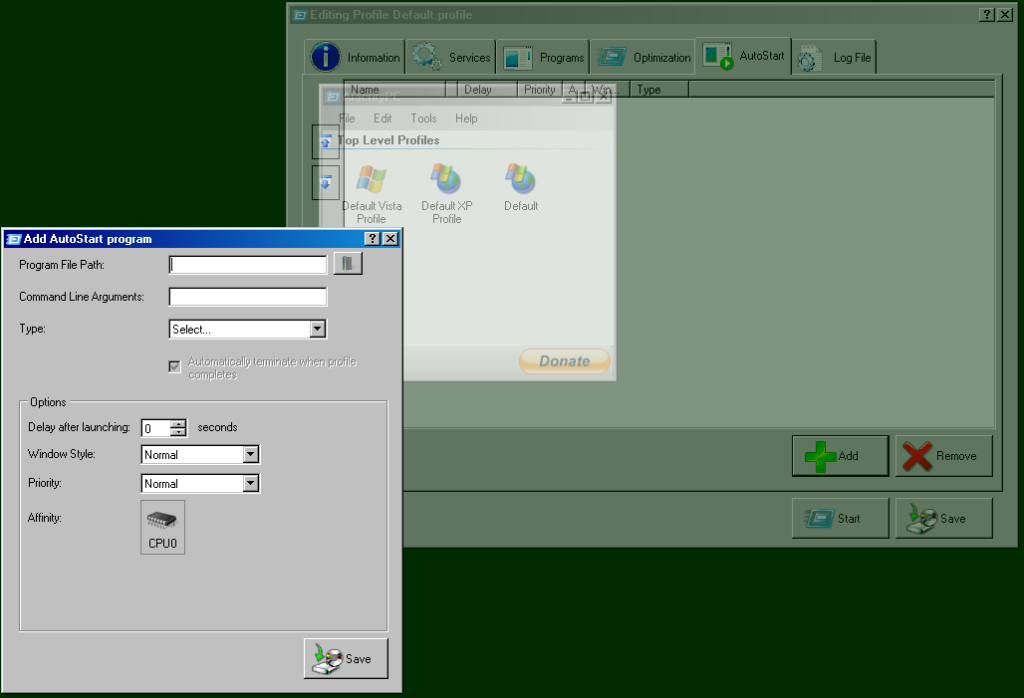
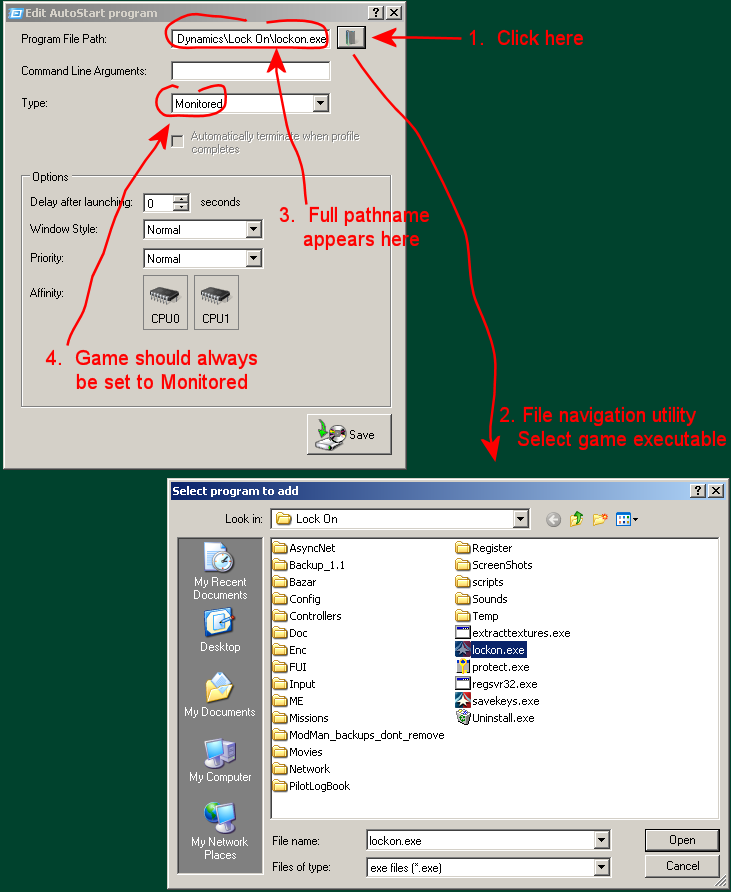
Next, you want to enter the full pathname of your game executable. The easiest way to do that is to click on the button to the far right of Program File Path: and navigate to it:
If you are a TrackIR user, you will want to start the TrackIR Priority program that increases the priority of TrackIR making it a little smoother ingame. See Set TrackIR Priority for more details. Note: This is not necessary if you are using TrackIR 5 hardware as it is much improved over TrackIR 4.
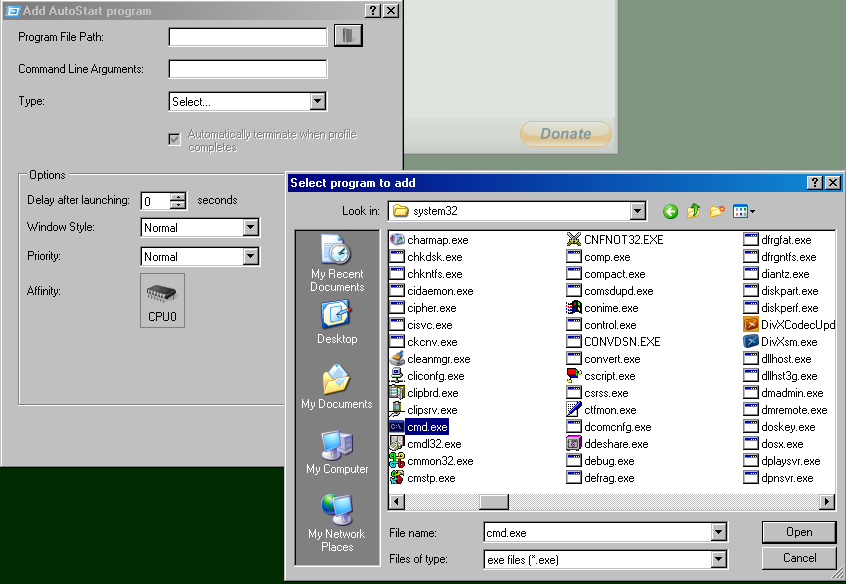
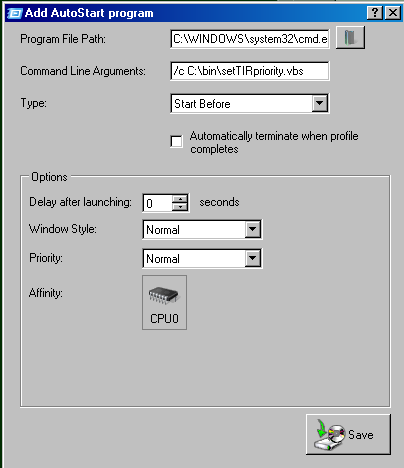
Since the TrackIR Priority program is a Visual Basic script rather than an executable, you must use "C:\WINDOWS\SYSTEM32\CMD.EXE" to run it and it's command-line argument will be the script: "/c C:\bin\setTIRpriority.vbs".
To set this up, first click the big green "+" and click the Program File Path: button and navigate to "C:\WINDOWS\SYSTEM32\CMD.EXE."
Then, enter the VBS script pathname and the "/c" option into the Command Line Arguments: field:
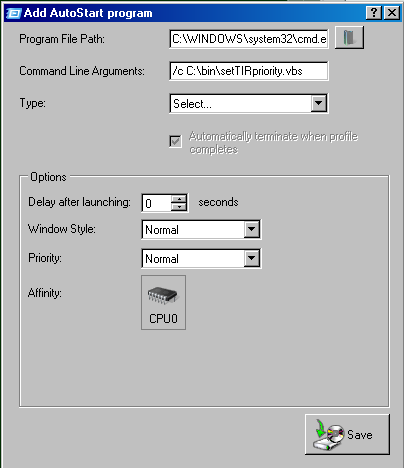
Finally, set the script to run before the game starts. Since the script runs so fast, there is no need to adjust the Delay after launching: field. Some programs would require adjustment here depending on how slow they run.
Now that all the necessary fields are filled in, click Save to put the program into place in the profile:
If you use CH Products controllers, you may want to have AlacrityPC load your CM Map before the game starts up. This is done in the same manner as the TrackIR Priority program. Here are the important fields:
Program File Path: C:\Program Files\CH Products\Control Manager\CHCtlMgr.exe
Command Line Arguments: c:\progra~1\chprod~1\contro~1\maps\lockon.map (for some reason, you must use 8.3 format with this utility)
Note: In order for this to work properly you must have CH Control Manager 4.50 or greater. It is best to simply download the latest CM from here.
Here is the AutoStart tab with all three programs installed:
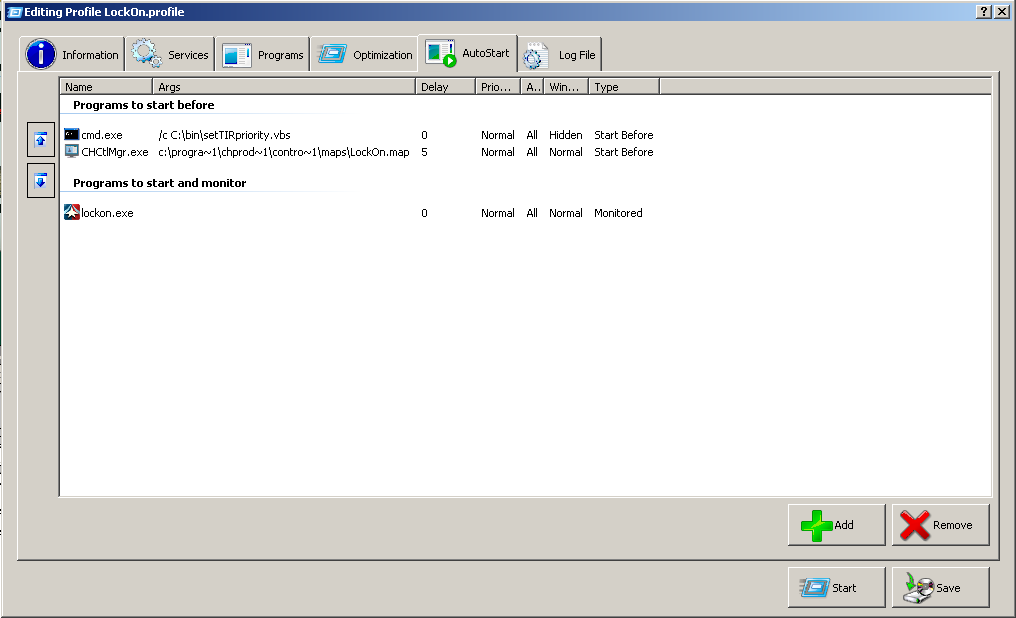
This game profile (Lockon) starts three programs total. The important one is the game itself (Type: Monitored), pre-loading the TrackIR Priority program as well as the CH Products controller map.
Notice I have set the Delay field for CHCtlMgr.exe to 5 seconds. This program loads rather slowly so I thought I'd give it a little extra time before letting the game start.
As always, be sure to click the Save button to exit the AutoStart window. You will need to click Save again after that to save the entire profile.
The final task is to create a startup icon for causing AlacrityPC to launch your game. To do this, simply click and drag the game profile you created to the desktop (or wherever you want it to go):
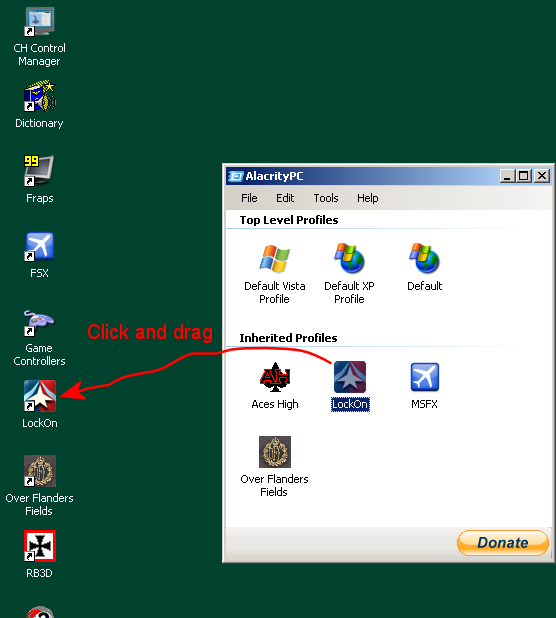
Once done, you will simply click the shortcut icon to start the game. You do not need to have AlacrityPC running as the shortcut will take care of everything.
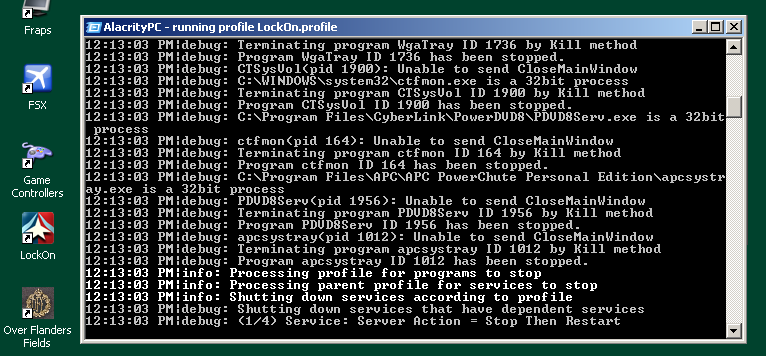
To run your game under AlacrityPC control, simply click the desktop icon you created in the previous step. The first thing you will notice is a Command Prompt window showing the tasks AlacrityPC is working through:
Once the game is up and running, you can actually get back to AlacrityPC by pressing ALT-TAB. This will minimize the game and expose this window:
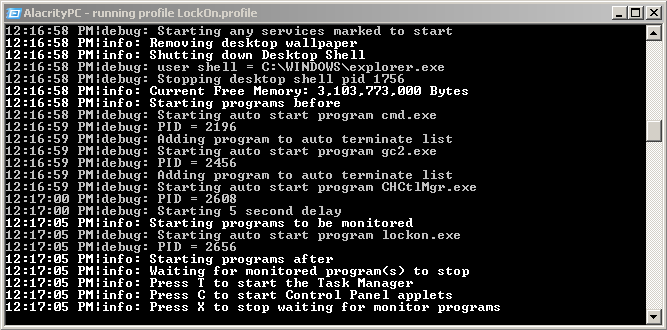
Notice the three "commands" listed in the last three lines of the window. If you press the "T" key, the Task Manager will pop up showing you how well AlacrityPC has done in suspending processes during the running of your game. This is a very handy way to test your profile.
I hope this guide helps you get better performance out of your computer so you can enjoy your gaming experience.