One major complaint people have about the CH FighterStick is the stick handle is too tall making it difficult to reach the upper POV (Coolie) Hat. This mod converts then lower 4-way Castle Hat (H2) into an 8-way so it can be used as a POV.
This mod involves both hardware and software components. The hardware mod is very simple and involves making the hole larger where the hat stem contacts the four hat buttons. The reason there is a software component is because the CH driver will not recognize the Castle Hat as an 8-way unless the hat is programmed to do so.
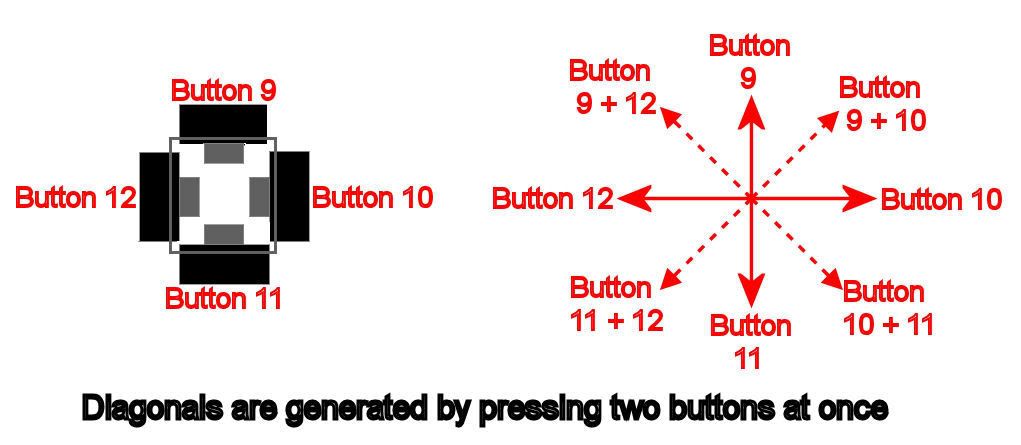
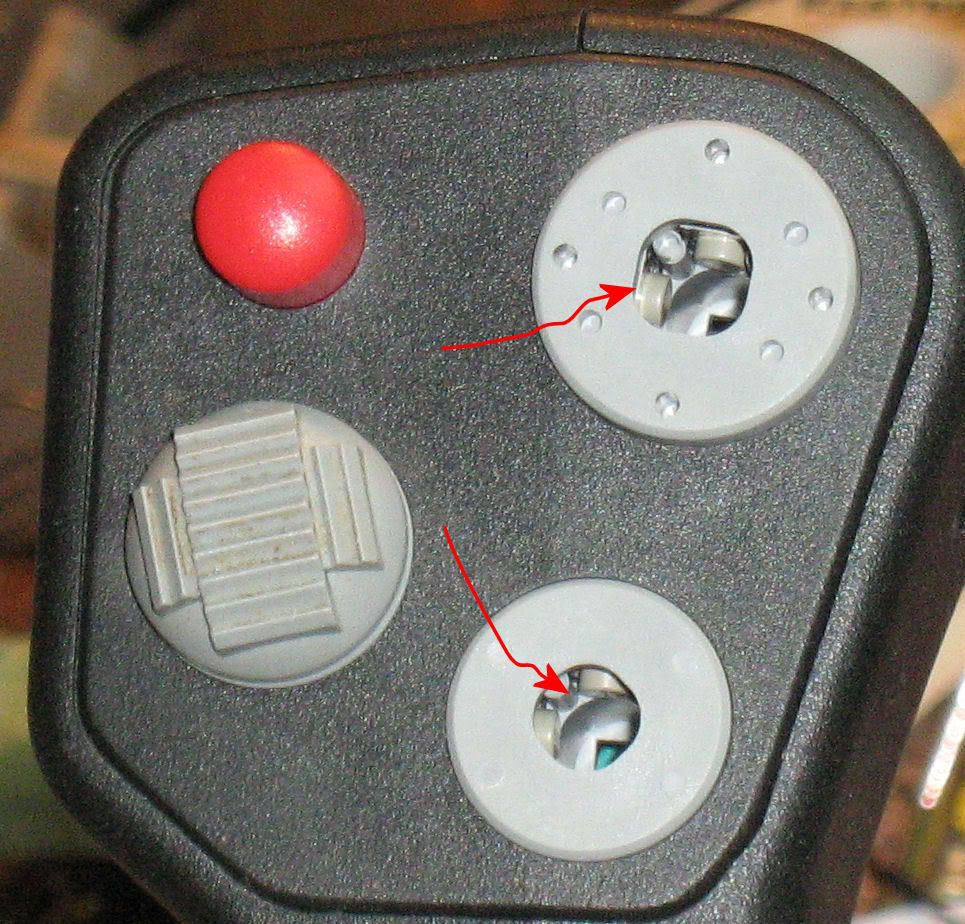
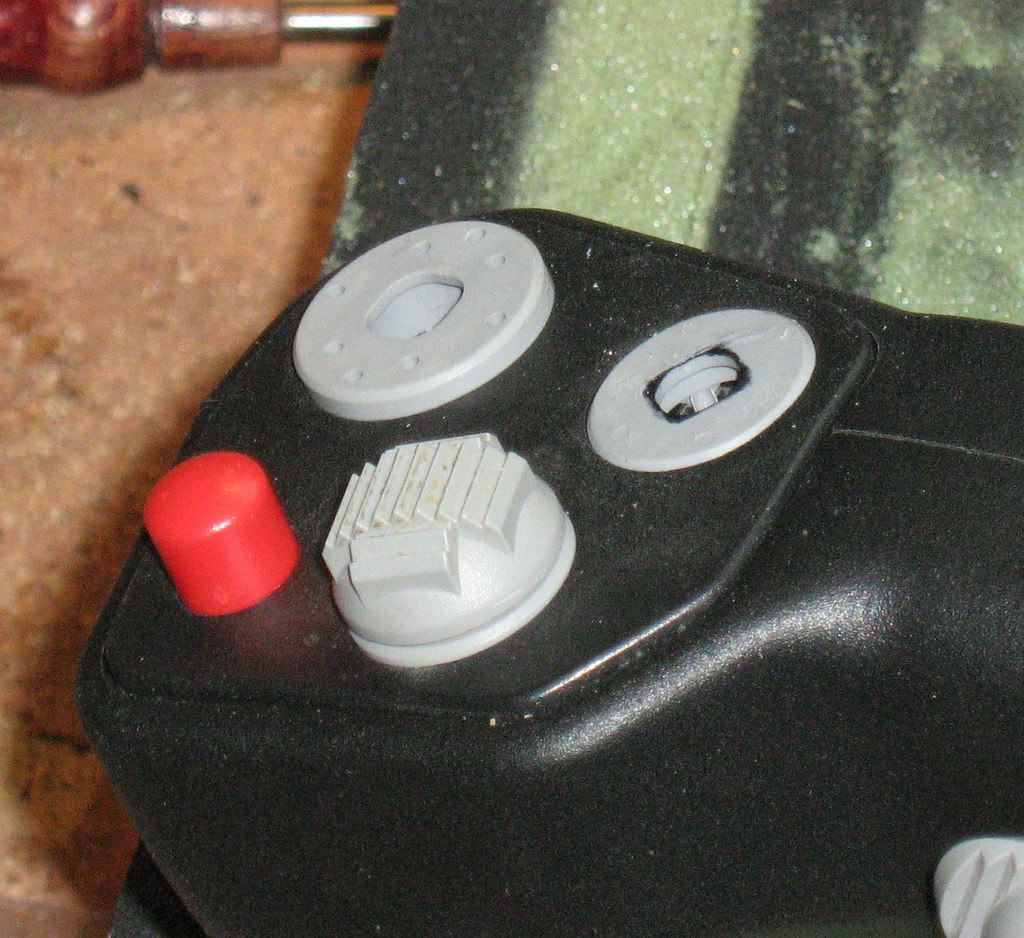
Electrically, an 8-Way hat is simply a 4-Way with the extra ability to press two buttons at once (chord) to produce the four additional (diagonal) actions. A 4-Way hat on a joystick is typically built so that you can only press one button at a time. To make that button an 8-Way, you must alter the shape of the guides that house the hat cap and shaft. The following diagram is the Castle Hat from a CH FighterStick and shows the four buttons used. To produce the four extra functions, two buttons must be chorded which generates a "diagonal" of those two buttons. The problem is, just because we get a hat to electrically behave as an 8-Way, the software driver must be "told" of this change. Because of the great programming potential of CH Command Manager software, we can achieve this.
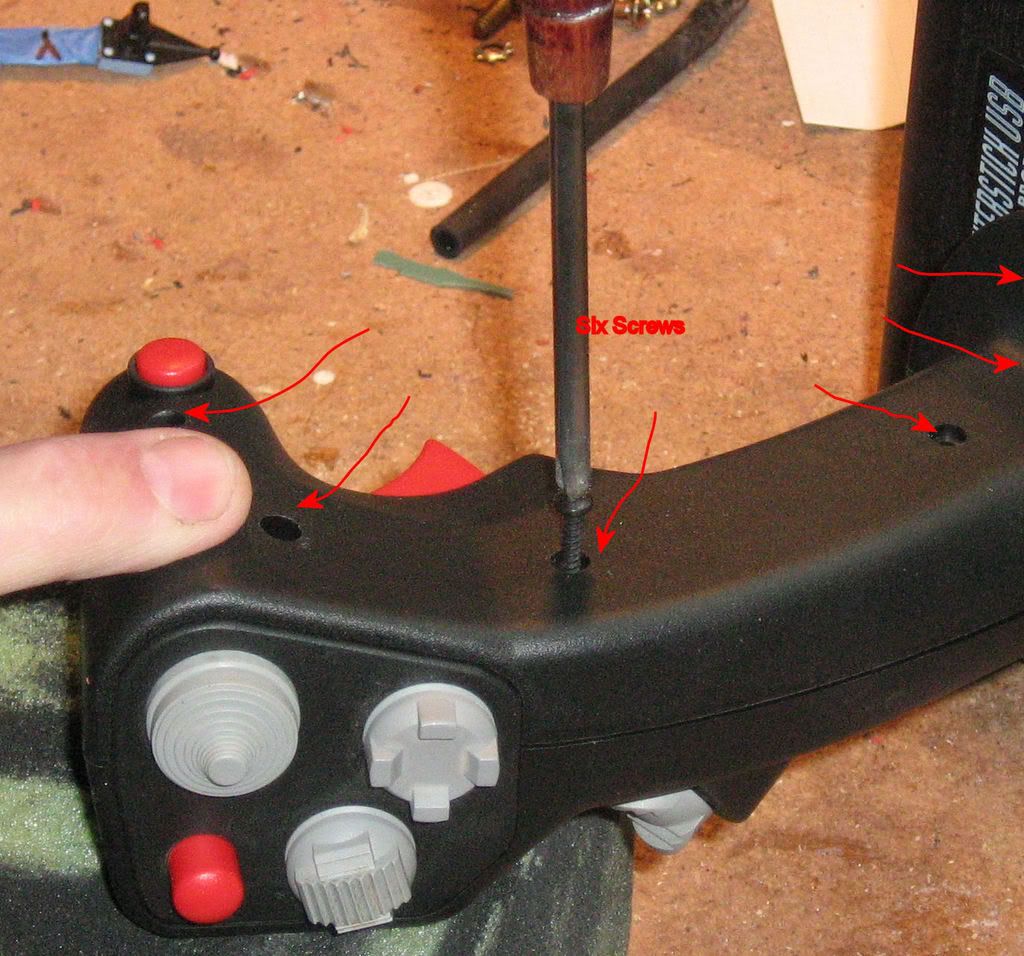
First, remove the right half of the FigherStick handle.
Next, lift the hat assembly out of its cradle and remove the hat screws from both the Coolie and Castle hats.
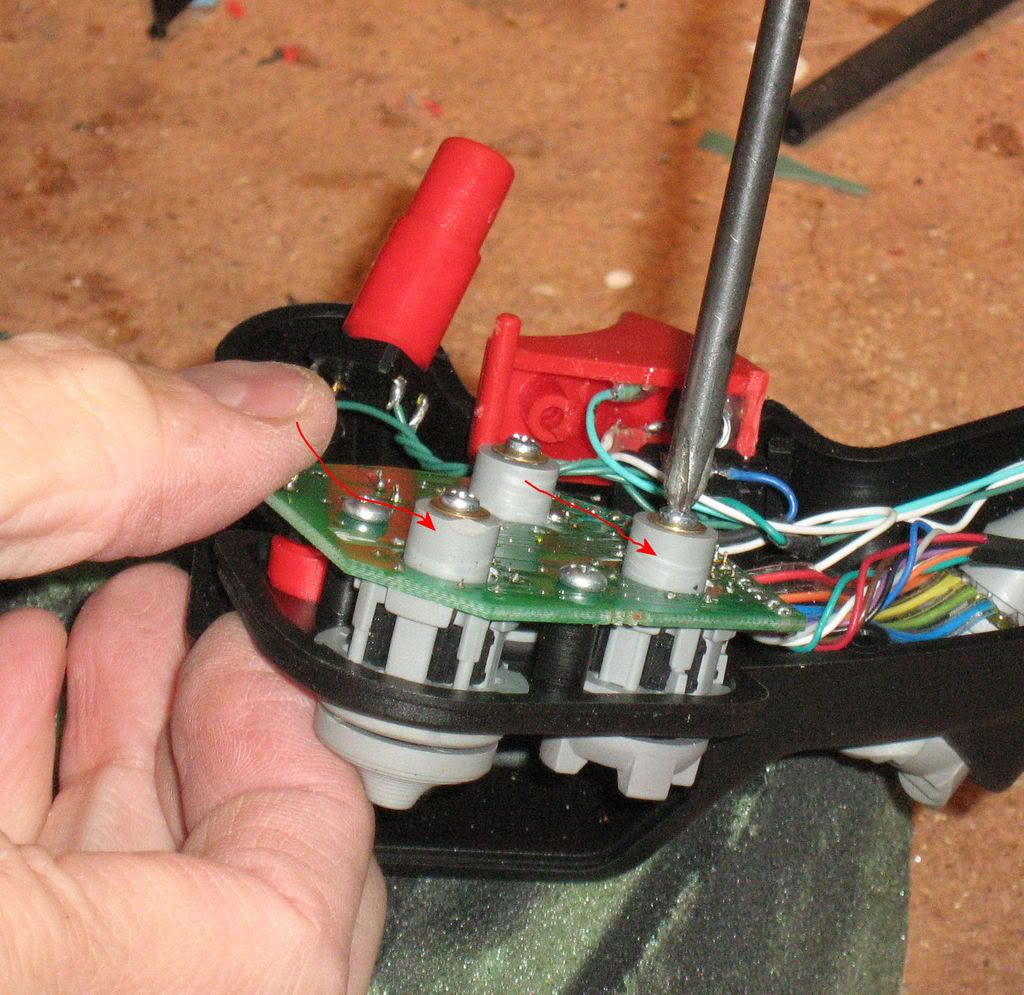
Once the screws are removed, you can slide the hat caps out.
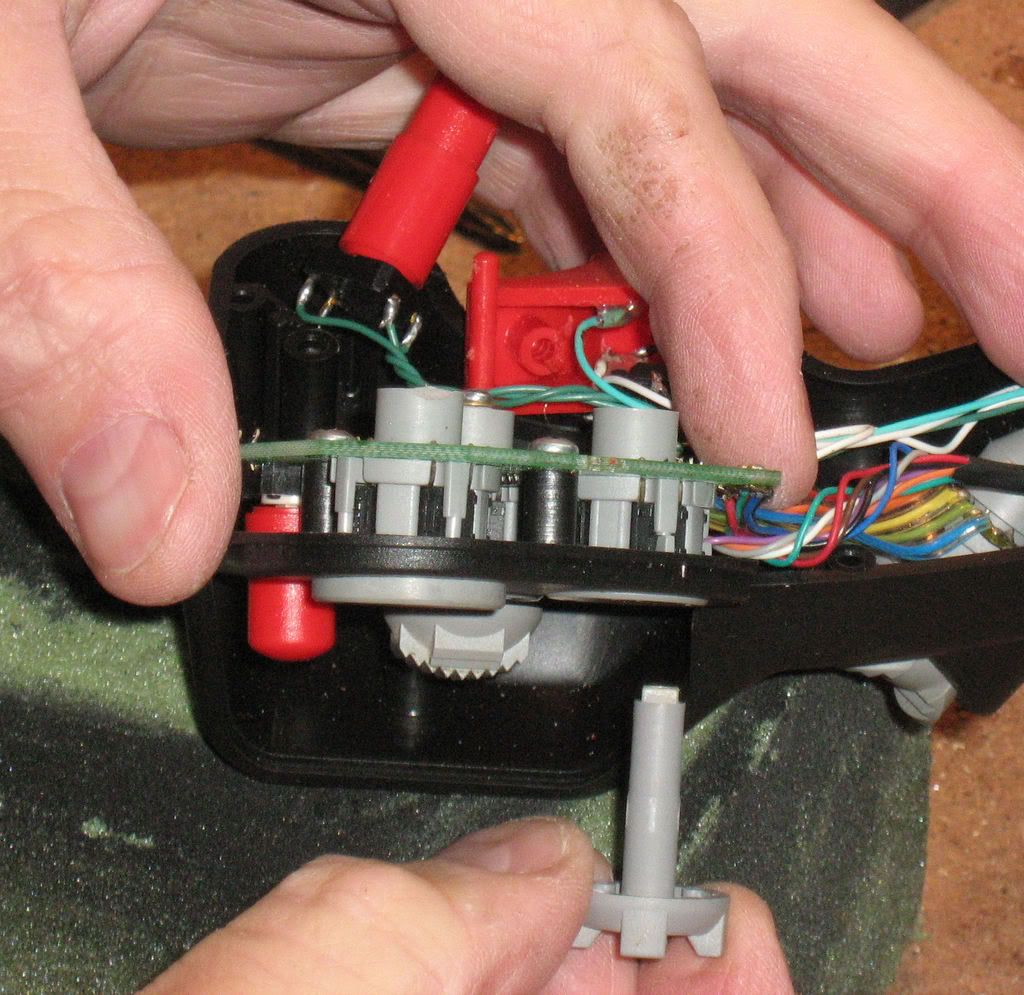
This will reveal the Castle hat hole we must enlarge to cause the hat shaft to press two buttons at once.
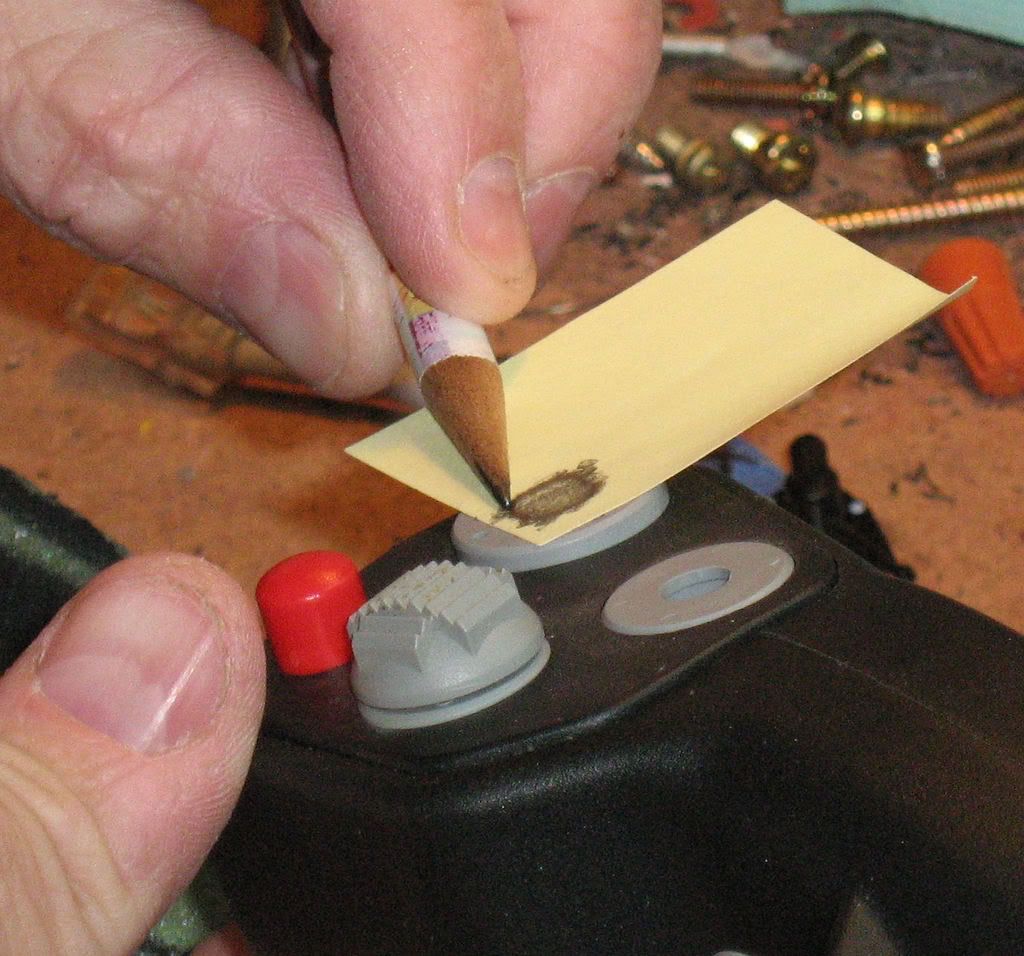
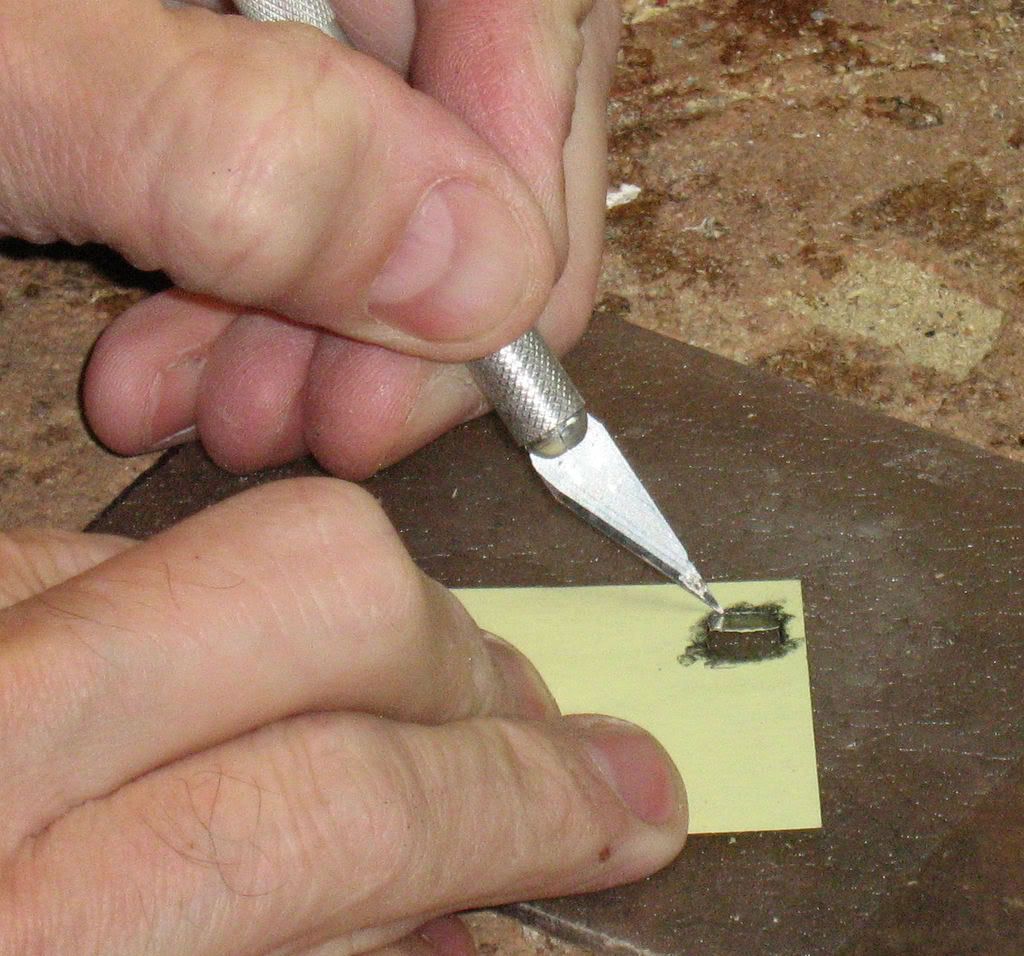
To get the dimensions right on enlarging the Castle hat, use a Post-It note to trace around the Coolie hat then cut out the pattern with a knife.
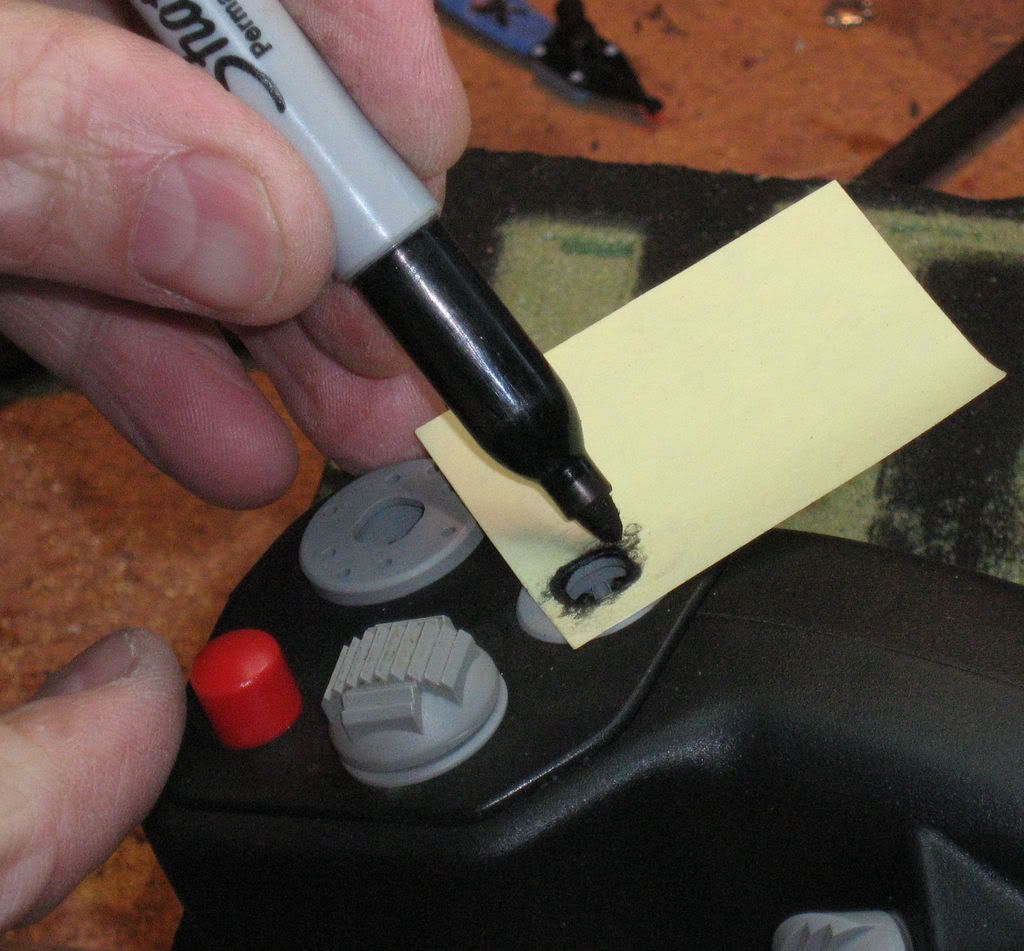
After you've made your template, trace around the Castle hat using a permanent marker so you can tell how much material must be removed to make the hole the same as the Coolie (POV) hat.
Finally, trim the hole using a Dremel tool and clean up the work with a knife. You can slide the hat shaft into place and monitor if the shaft is able to press the two sets of buttons in a chord fashion. If not, you may need to trim the hole a little more. Be careful not to make the hole larger than necessary. Trim it just large enough to allow adequate chording.
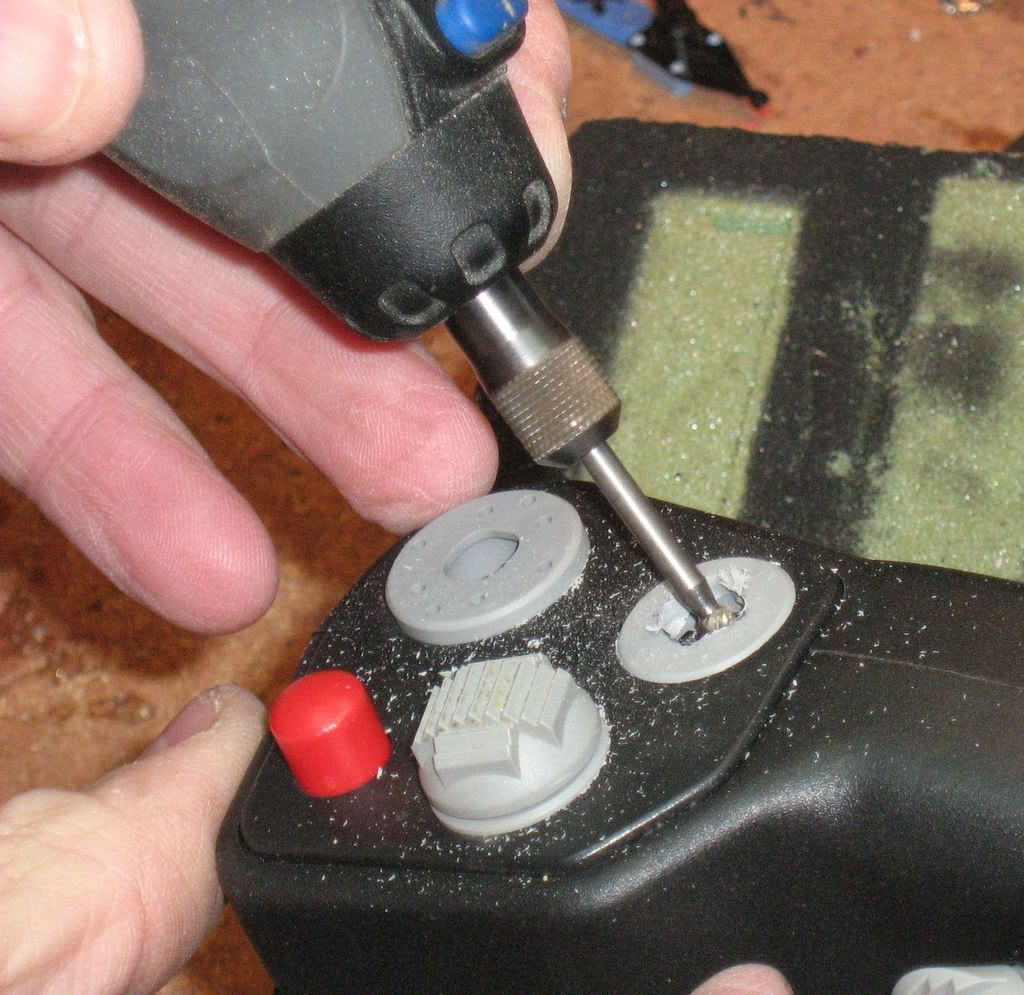
Blow the hole out good with some compressed air to make sure there are no chips or debris down in the hole.
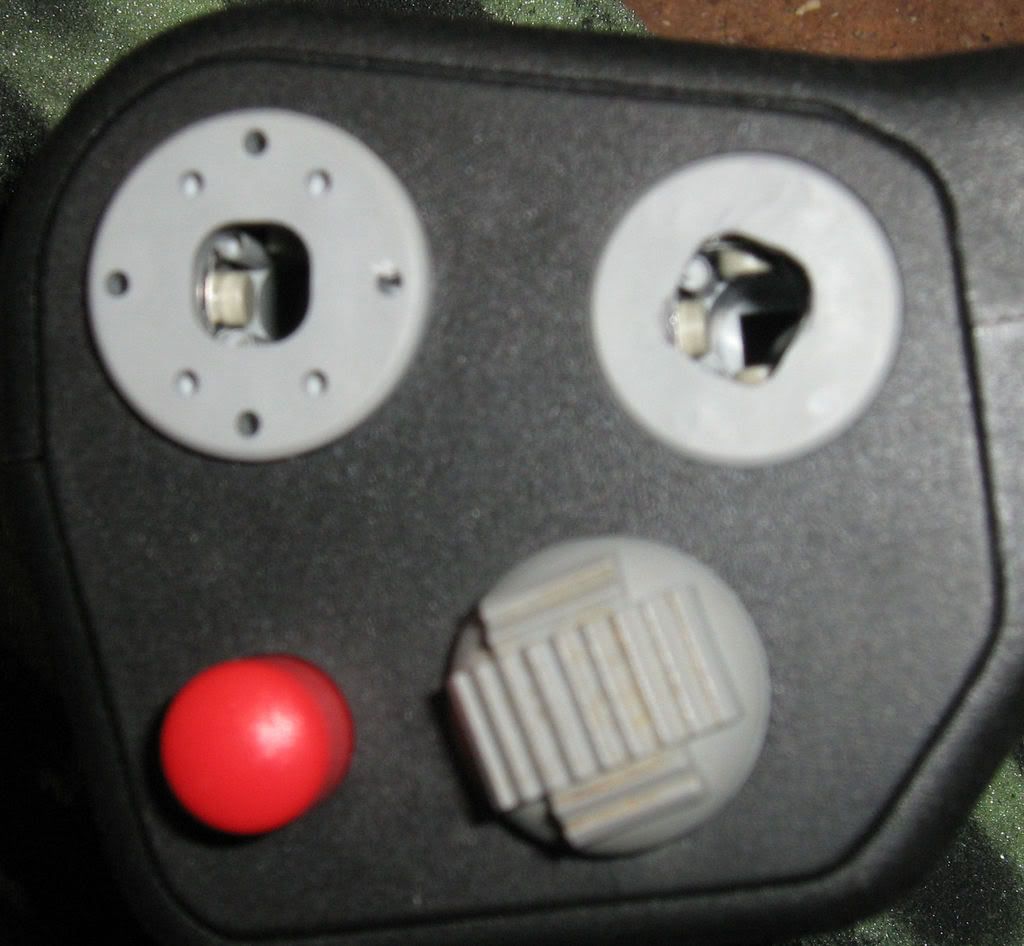
Here is what the hole should look like after you're all done.
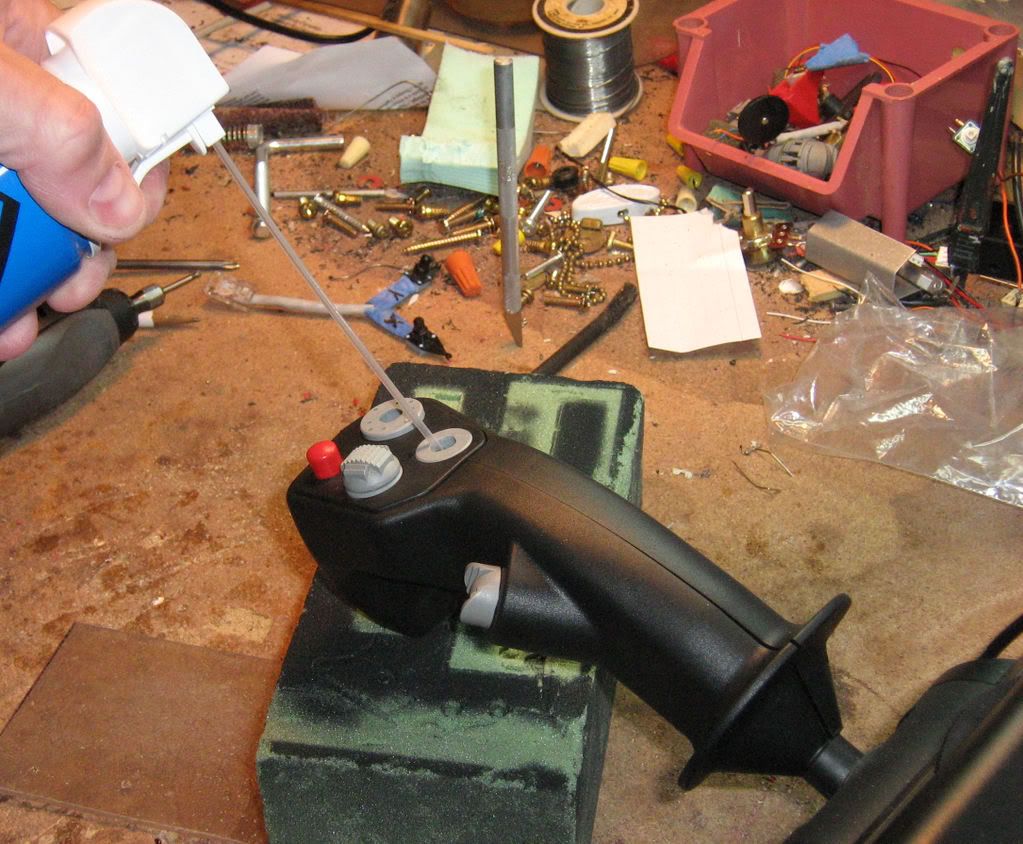
Put the parts back together and you will be ready to proceed to the software component of the mod. If you desire, you can swap the hat caps so that the Coolie is in the lower position. This might make using the lower hat as a POV feel more familiar. It's no big deal as swapping them back is as easy and pulling the screws and sliding them out.
You may want to leave some of the screws out until you are sure the buttons are going to chord properly.
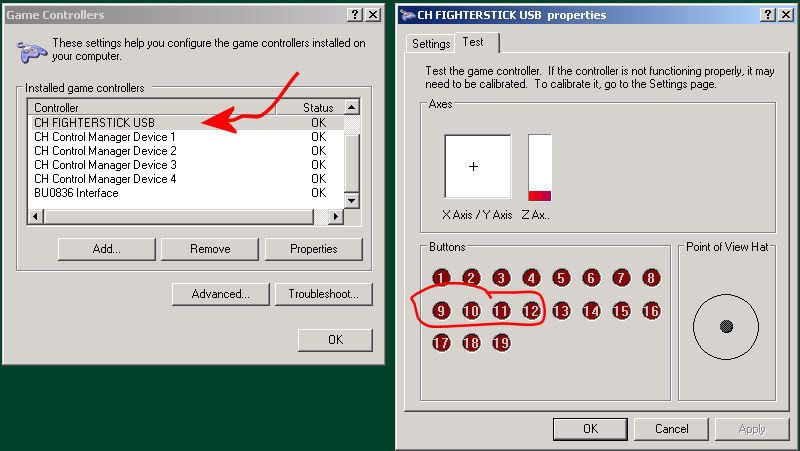
Plug the stick into your computer and bring up Game Controllers. Select the controller from the list and click the Test tab. The buttons you are interested in are buttons 9-12 as those are the Castle Hat buttons.
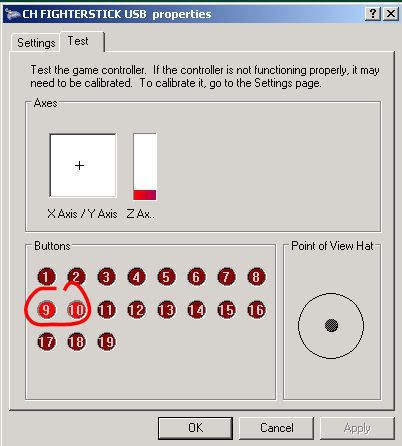
To test the 8-way behavior, move the hat and verify that button 9, then buttons 9 and 10 both light up, etc. as you work your way around the perimeter of the hat. In the following example, I have pressed the hat into the upper-right corner (Forward-Right) position. Notice that both buttons 9 and 10 show on in that position.
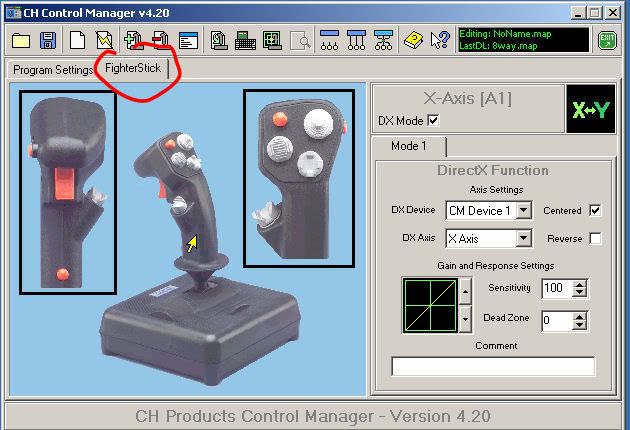
In order to use this hat as an 8-way ingame, you must program it using CH Command Manager. One nice side benefit to this mod is you don't really need to use it if later on you decide you want to go back to the way things were. Simply remove the programming and the stick will behave as it always did before.
This example is for Aces High and shows how to build a command map for a FighterStick where the Castle Hat duplicates the function of the original Coolie to perform the eight view positions of the keyboard's keypad.
First, bring up the Command Manager program. Before we go further, let's just verify that CM can see the new hat function just as Game Controllers did.
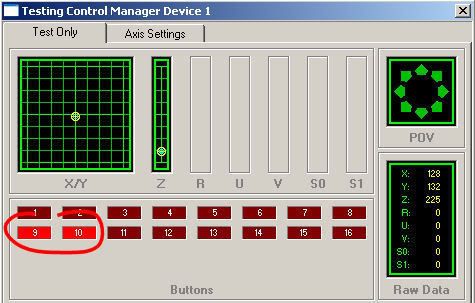
Click the Test/Calibrate button and choose your FighterStick controller. When you move the Castle Hat in the Forward-Right view position, you should see buttons 9 and 10 come on together just as before.
Now, we're ready to build a CM map for the stick.
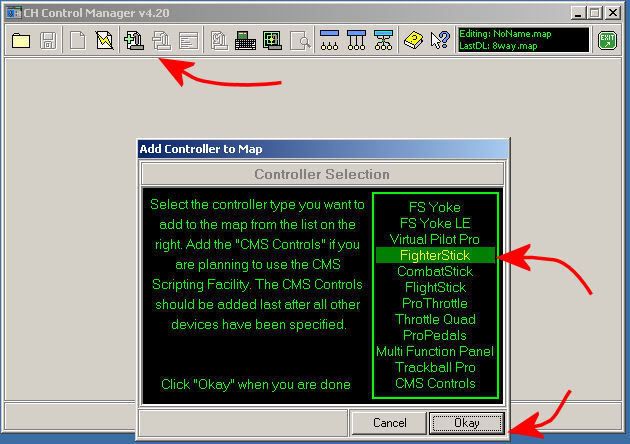
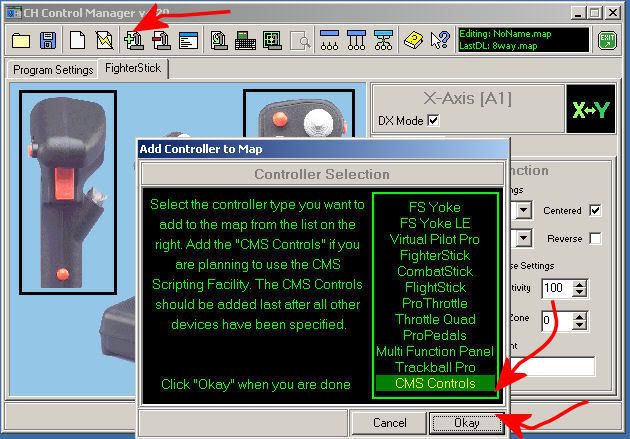
Assuming you have not already loaded a map (use the Clear Map button to clear CM if necessary), click the Add button to add a new controller to the map. Find the FigherStick controller in the list and select it. Press Okay to add it to the map.
Your CM screen should now look like this:
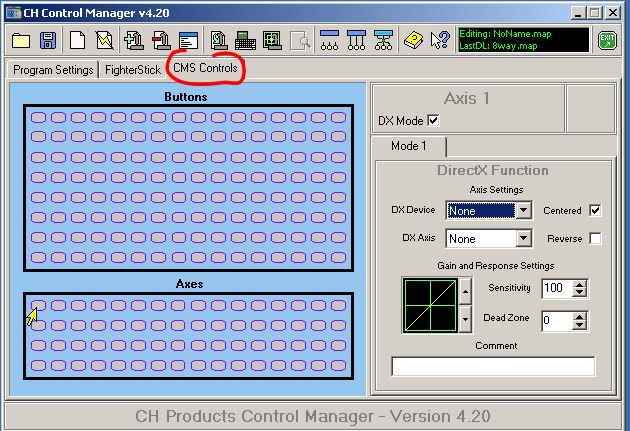
Because we are going to need to do some programming, we need the CMS Controls as well. Click on Add and choose CMS Controls from the list.
Your CM screen should now look like this:
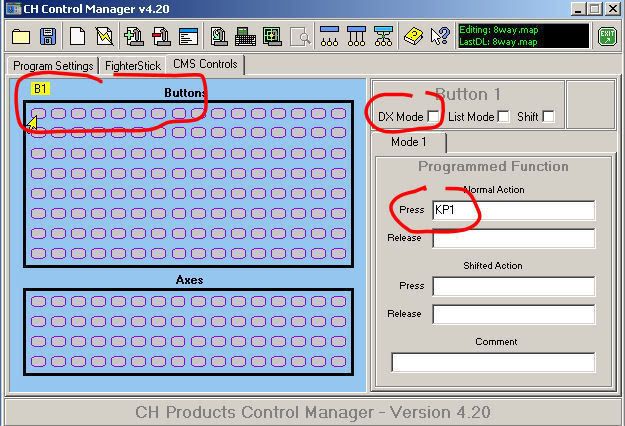
Next, we need to create a set of nine (eight if you want) "software buttons" which will represent the view positions our 8-way hat is going to generate. Aces High uses the nine keys of the keypad to generate eight view positions around the aircraft as well as "UP" (keypad 5 key). [KP5 will be included even though it is unused as an 8-way hat has no way to utilize the "up" view]. Here are the nine software buttons and their associated Command Manager values:
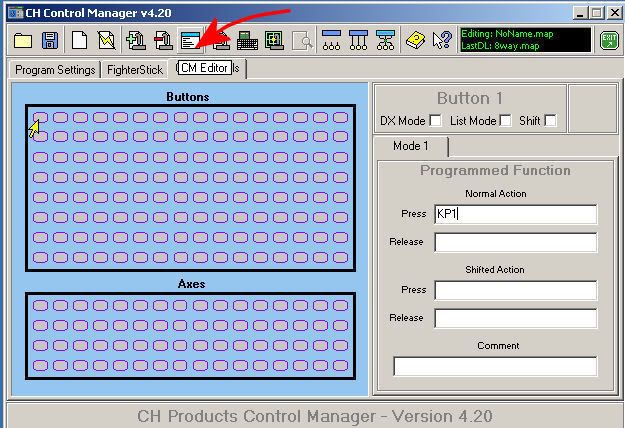
To create "Software Button 1" (Rear-Left View), click the top-left most grey button in the Buttons section of the CMS Controls tab. Next, unselect the check-mark in DX Mode and enter the text "KP1" in the Press field of the Normal Action section of the Programmed Functions area of the CMS Controls section. The following screen shows how it looks when you have created "Software Button 1." Repeat the process for the other eight buttons (you can leave button 5 out if you wish) and this will complete the software button programming.
Now we need to write the program that controls the new 8-way hat. To do this, we will need to bring up the Script Editor. Click CM Editor to accomplish this:
This will bring up the editor. Enter the following lines into the editor. When you are finished entering the program, you should test it by clicking the Check Script button. If there is a problem, you will get an error message at the bottom of the screen telling you what and where the problem is. Be sure the program tests successfully before exiting the editor. Click Exit when the script checks out good and you are done with the programming.
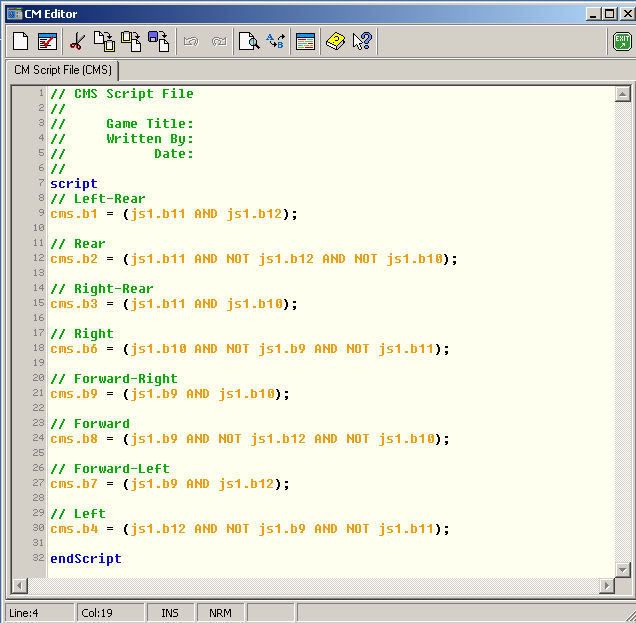
Just to help you understand a little bit how the scripting works:
Everything that appears between the "script" and "endScript" lines are commands. You must put all you command lines there.
The lines that begin with "//" are comments. They simply allow you to annotate the commands you enter.
Strings like "cms.b1" represent the software buttons we created in the previous step. "cms.b1" means "software button 1". As you can see, we address all the software buttons (except button 5) we created.
The string "js1.b11" means "button 11" (Castle hat down) of JoyStick (js) 1. Each controller you have in your map is assigned a number with the first one being 1. Since we have only one controller in our map, we don't have anything other than 1. If we added a Pro Throttle to our map, we would reference it with "js2". If we added Pro Pedals in the third tab, it would be "js3", etc.
The string "js1.b11 AND js1.b12" means the phrase returns "TRUE" if buttons 11 and buttons 12 of JoyStick 1 (FighterStick) are currently held down. This causes software button 1 (cms.b1) to become active. Since you assigned "KP1" to that button, that would cause CM to send out a Keypad 1 command to the game. Each of the eight hat positions will send commands similarly.
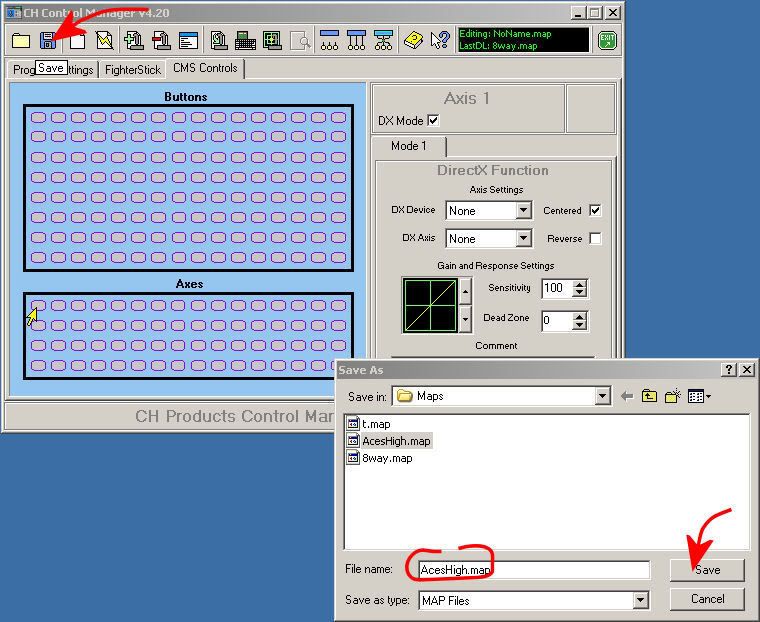
We are now done programming the FighterStick and are back at the main CM screen. The next important thing to do is save the work you've done. Click the Save button and enter a name for your map.
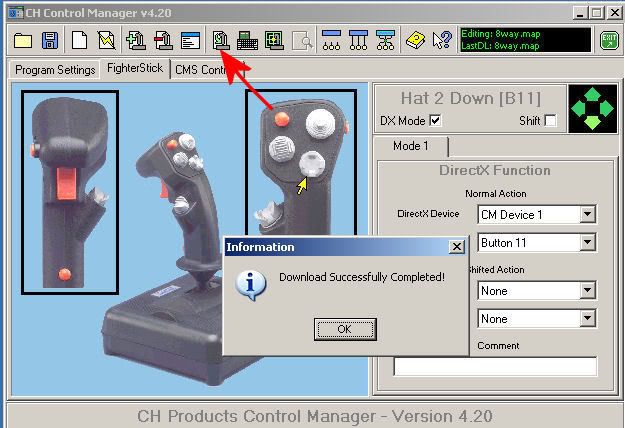
All that is left to do is to "download" the map to the FighterStick. CH controllers have their own memory for storing the map you create but you must tell CM to download it before you will be able to use the map. To accomplish this, simply click the Download button and if all goes well, you will get the "Download Successfully Completed" window. If there was a problem, CM will usually direct you to where the problem occurred so you can fix it.
Before you exit CM to test the hat in Aces High, you should test it inside CM to make sure each hat position outputs the appropriate values. To do this, click the Key Test button and move the Castle Hat around to all eight positions and verify that you get the correct values. Note that the key tester shows both a "press" and "release" value so each hat press will generate two outputs.
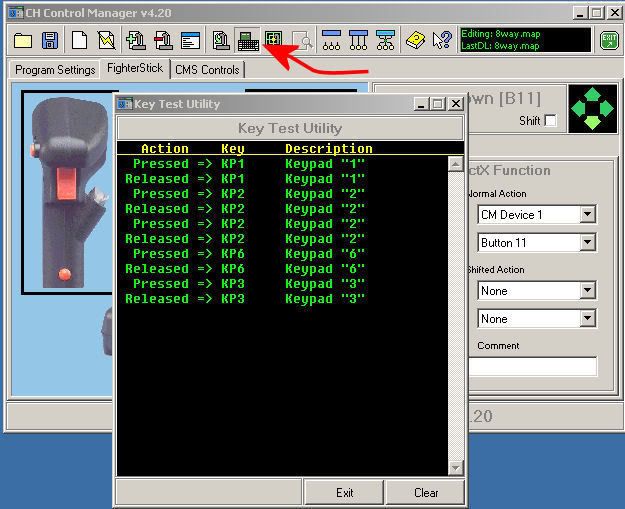
If all eight hat positions output the correct values, when you get in Aces High, you will find that the Castle Hat will generate all the views that the Coolie Hat does. You are now free to reassign the Coolie Hat values to other functions as desired.